Nowadays, there are tremendous social media sites where you can share your life in a day or your lifestyle via posting stories and reels. Instagram is one of the most infamous sites we can use for that. The Facebook corporation later owned it. That is why it has become more popular, especially for those people who love to capture random photos and videos. Having a high-quality post is a must to get thousands of likes. Therefore, we must know how to upload a good quality video on Instagram. This post will tackle the essential tips and instructions we need to follow. Please proceed to discover more details.

There are numerous and different reasons why your Instagram video is blurry after uploading it. The first on the list is the bad and unstable connection you have. Your internet connectivity brings an essential factor in making the uploading process successful. It affects the speed of your uploading process and the chance that it can drop the quality of your video. Another reason is the camera used in capturing the footage. As we all know, the back camera is more precise than the camera. Then, the outdated Instagram application can also affect the quality. We need to note this to ensure our uploads are of complete quality.
Many users of Instagram want to know how to make video quality better on Instagram? In line with that, we will show you a few ways to do that in this portion. Please follow each tip and remember every detail so that we will not lose video quality on Instagram while uploading.
The first tips we can give you will be possible during the recording moments. We need to make sure that we will record a good quality video using a high-quality camera. If you are going to use your smartphone, it is recommendable to use the back camera rather than the front camera. In addition, you can also set the Resolution by modifying its camera settings. In addition, please prevent too much motion while capturing videos as we alleviate the shaky part. These few elements can make our video of excellent quality.
If you are done capturing your video, but the quality is still bad, it is now necessary to use an enhancing tool to solve the problem. Fortunately, we have the great AnyMP4 Video Converter Ultimate. This tool is a great tool that aims to help us in converting our video file formats. However, the tool is very flexible and possesses advanced AI technology. This technology brings a smooth process to its toolbox.
Under this Toolbox, we can use a different feature like the Video Enhancer, which we will use in this topic. In addition, we can also see a feature for Colour Correction, Video Cropper, and trimmer that we can also use to enhance our video for Instagram. Therefore, let us discover what the Toolbox can offer to improve our videos in this portion.
Secure Download
Secure Download
1.Download AnyMP4 Video Converter Ultimate for free by going to its official website. Then install it on your respective computer. On the interface, please access the Toolbox icon.
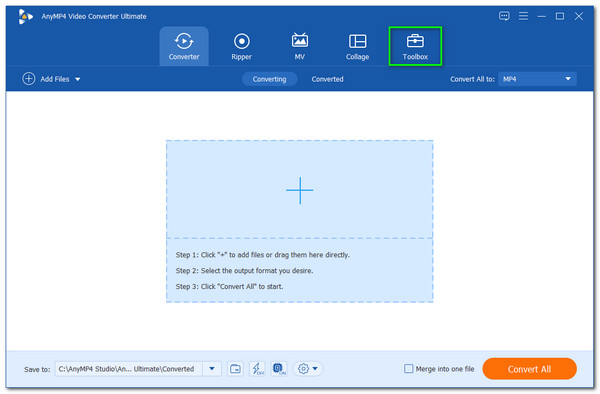
2.It will now show you different options for its features; with this tool, we can modify and enhance our Instagram video with ease. Since we want to improve the quality of our video, kindly locate the icon feature for Video Enhancer.

3.Then, it will show you a minimal tab where you can see a Plus icon. Click it, and a file tab will appear where you can add the video files you want to improve quality for Instagram. Choose the video and click the Open button.

4.After that, another new tab will appear that presents all of the features we need to enhance our Instagram video. Please ensure checking the icon box for Upscale Resolution and Reduce Video Shaky. You may also set up the resolution of your video. Access the drop-list for Resolution and choose the suitable dimension.
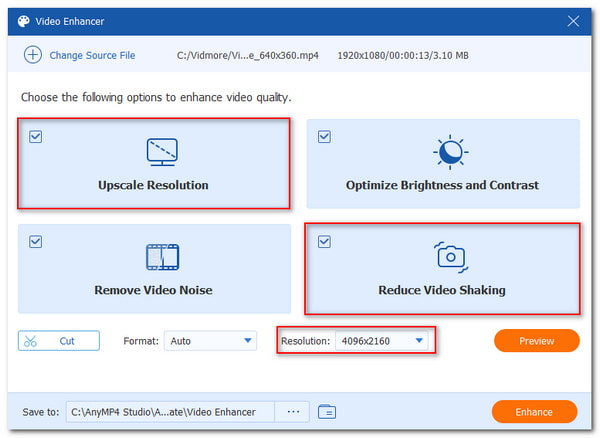
5.If the setup is now good to go, it is now the time to click the Enhance button to start the process.

6.Now, the enhancing process begins, and we need to wait until we see a message tab that says Video Enhancement is completed.
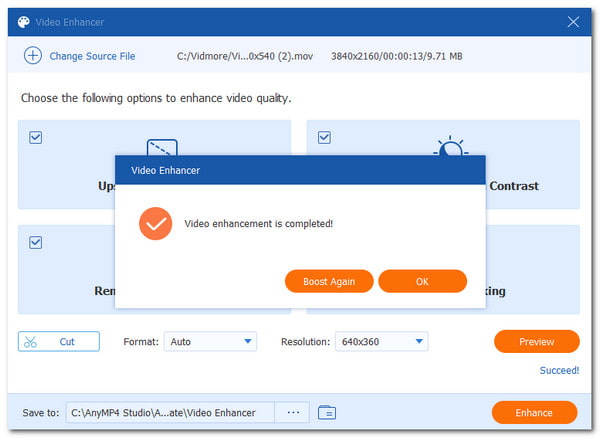
That is how AnyMP4 Video Converter Ultimate performs to provide the best quality video for Instagram. We can see how flexible the tool is and how smooth the process is. That is why there is no wonder why it is the best tool to use to upload a high-quality video on your Instagram feed.
Part of uploading a high-quality video to Instagram is knowing the proper specification of our videos. An improper spec on our uploads will lead to lousy quality output. In line with that, here is the critical specification you need to remember for Instagram posts.
Aspect Ratio |
Video Size |
|---|---|
| 4:5 | 1080 × 1350p, 1080 × 608p, and 1080 × 1080p |
| 9:16 | 1080 × 1920p and 1920 × 1080p |
| 9:16 | 1080 × 1920p, 1920 × 1080p, and 1080 × 1350p (IGTV videos for the Instagram feed), 1080 × 1080p (IGTV videos from the profile grid) |
| 9:16 | 1080 × 1920p |
| 9:16 | 1080 × 1920p |
Another tip will come to the Instagram application itself. Uploading a full-quality video on Instagram will be possible if only we enable the app.
1.Go to your Instagram, open it, and see its interface. On your profile, locate the three dash icon and find the Settings.
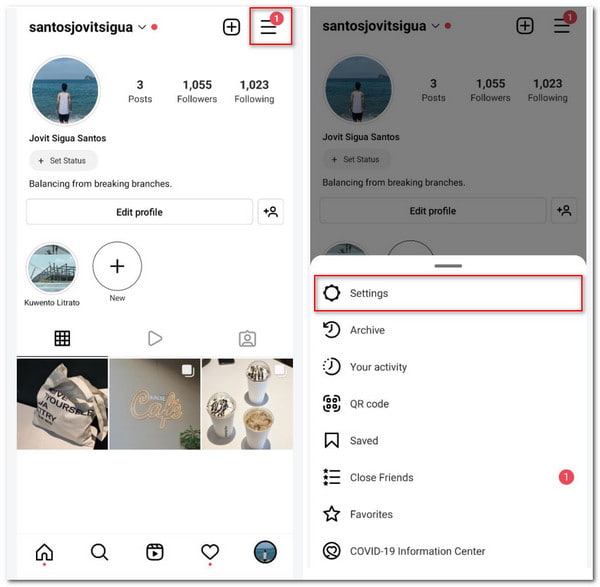
2.On your setting, kindly locate the toggle icon for Data Saver. Please enable it.
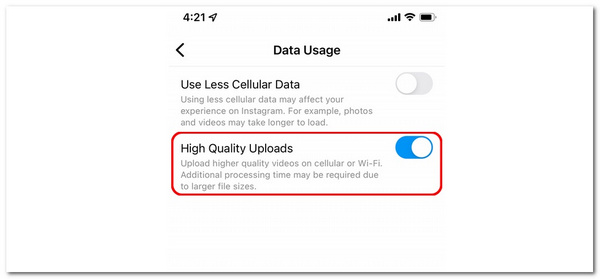
3.Try uploading a video and observing its video quality.
Those are the simple steps in enabling high-quality videos on Instagram. We need to ensure that we have the proper settings to have an appealing Instagramable feed. This process is also an effective way to keep video quality on Instagram stories.
Can I directly upload a high-quality video from Instagram to Facebook?
Yes. Uploading to Instagram and immediately sharing it to Facebook is possible if you enable it using the toggle icon. This way applies to regular posts and stories.
Does the wrong aspect ratio affect the quality of my video when uploading on Instagram?
Yes. Having the proper aspect ratio and other necessary specifications for your video post is essential in maintaining the excellent quality of the Instagram video. If it is not, we can expect a blurry result after the uploading process. You can use an aspect ratio converter to change the Instagram video dimension.
Does having a filter on an Instagram life can lower the quality of our video?
There is a possibility that using a filter while we are on Instagram Live can lower the quality of the video. As we all know, using filters will use connectivity. Once our conception decreases, the quality of our video also decreases while we are doing IG Live.
The best way we need to do this is to upload a high-quality video on our Instagram. Please follow each detail and do not miss a thing. We hope for a successful upload on your Instagram after reading this article. Please do not forget to spread this with a friend so that we can help them with the same scenario.