Zoom became one of the most popular video communication apps since the pandemic. From that time face to face gatherings were prohibited by the government. Most people use this tool for webinars, online conferences, live chats, virtual classes, etc.
Zoom is accessible on most Windows, Mac, Linux, iOS, and Android devices like any other communication tool. Suppose there is one thing Zoom is good about. In that case, it is the capability to accommodate over 1000 participants in a single call. There is no doubt why many government agencies and other sectors use Zoom as their choice of online communication.
One of the best unique features of Zoom is to record video conferences. Since video recording has become the platform in the new normal. It is essential to have a better quality video recording. This article will give you tips on improving video quality on Zoom with ease.

Once you record a video conference on Zoom, you cannot assure if the quality is good or bad. Sometimes the output is blurry and lousy if the internet connection is poor while the recording is ongoing. But worry no more because even if you record a terrible quality video on Zoom. You still have the option to enhance the recorded video using the best video enhancer software on the market.
AnyMP4 Video Converter Ultimate is certified as the best video quality enhancer in video editing. Using this AI-powered video enhancer software, you can upscale your Zoom recorded video quality in four easy ways. It sounds unbelievable, but this tool can upscale your video resolution to high definition. Moreover, if you want to optimize the contrast and brightness of your video, it is also manageable through this software. Another way to enhance the quality of your video is to remove video noises and reduce shaky motion.
Here are the steps to enhance Zoom video quality with AnyMP4 Video Converter Ultimate
Step 1: Download AnyMP4 Video Converter Ultimate by visiting its official website. Then install it on your device by following all the steps for installation.
Secure Download
Secure Download
Step 2: After installing the tool. Launch the program and click the Toolbox icon located at the top corner of the main interface. Then on the toolbox window, tap the Video Enhancer box.

Step 3: After clicking the video enhancer box, add your files for enhancement by clicking the (+) symbol at the center of the window.

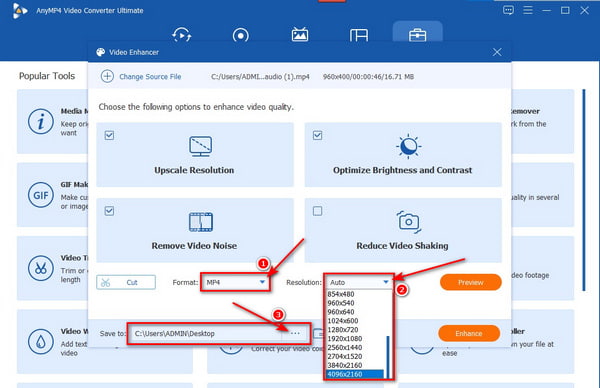
Step 4: After importing your Zoom recorded file, you have the control to enable the four options for enhancement. Optimize Brightness and Contrast, Upscale Resolution, Reduce Video Shaking and Remove Video Noise.

Step 5: After enabling all four options for video enhancement, choose the appropriate format for your video. Then, you can set the video resolution to higher definition, plus the folder for your output.
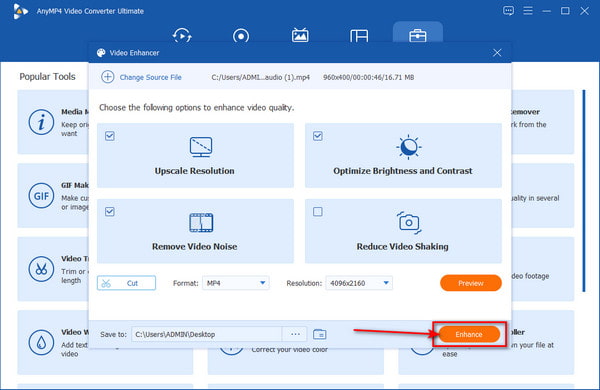
Step 6: Finally, once you are ready for enhancement, click the Enhance button and wait for a few minutes till the process is complete.
After enhancing your recorded Zoom video with AnyMP4 Video Converter Ultimate, you can check all the other features it offers. Find out how this software features compress video file size, trim the length of the video, and many more.
Zoom has built-in presets to improve the video before recording a conference or group call. Suppose you want to improve the quality of your Zoom video, make sure to pay for the Pro, Business, and Enterprise version of the app. Do not use the free version if you want to record a good video quality on Zoom. But if you cannot afford to subscribe to any of the paid versions, you can still sign in on the free version. But remember that using the free version of the app has limited features to improve Zoom video quality.
Here are the steps to improve video quality on Zoom.
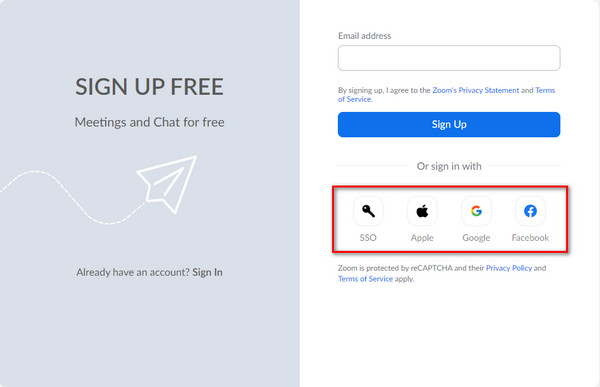
Step 1: Download or browse Zoom on your web browser. Then sign up with SSO if you want to access the app's full functionality. You can also sign up using your pre-existing accounts like Google, Apple, and Facebook for the free version.
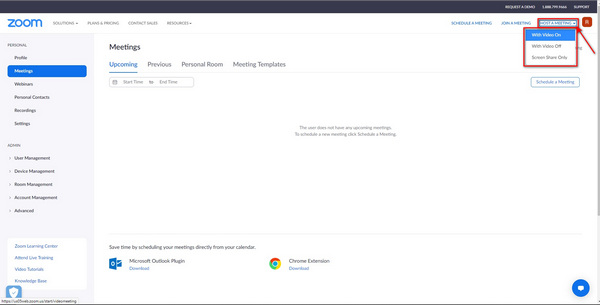
Step 2: After signing up successfully, Zoom will lead you to its main program window. Click the Host A Meeting option in the upper right corner of the window, then choose With Video On or any of the three options for hosting a meeting.
Step 3: Before hosting a meeting, of course, you need to agree to the app's terms and privacy policy. After clearly reading all the terms and conditions, click the Launch Meeting button.
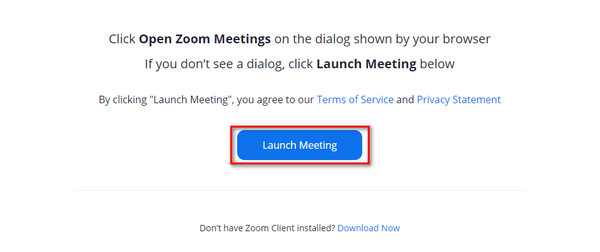
Step 4: After clicking the launch meeting button, the app will lead you to the Zoom Meeting window. Move your mouse straight to the bottom left corner, then click the Join Audio upward arrow. After that, select the Audio Settings option.

Step 5: After clicking the Audio Setting option. Another Setting window will open, including General, Video, Audio, and many more setting options. On the setting panel, click the Video icon, then set the camera resolution to HD.
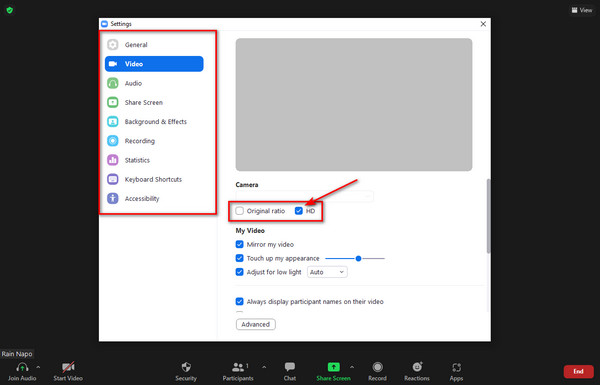
Step 6: Before recording a conference, click the Recording icon, then select a folder for your recorded file. After choosing a folder, you can now click the Record button to start your recording.
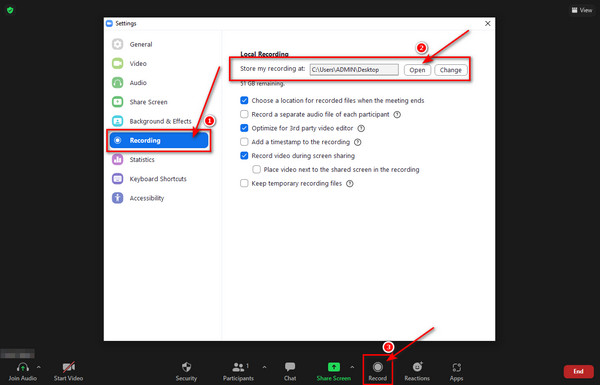
Step 7: After recording the conference, just click the End button at the right lower corner of the window. Then select the End Meeting for All option.

Setting your Zoom video recording to HD doesn't guarantee a good quality video. Always consider the strength of your internet connection when recording a video.
Can I record 1080p on Zoom?
1080p is only accessible on Zoom Business and Enterprise pricing plans. But suppose you are using the Free and the Pro version. In that case, you can only record videos on 720p, which is the standard resolution Zoom can provide.
What makes the video on Zoom grainy?
The two possible reasons behind grainy footage on Zoom are the video noise caused by small image sensors and poor lighting. When you record a video in poor lighting, the camera sensors will try to brighten the video images, which will cause the video noise to boost. And this will result in a grainy video image.
Should I always enable HD on Zoom?
It is not necessary to enable HD when recording on Zoom. Remember that the higher the resolution while recording, the larger the file size. And since HD uses higher bandwidth. You cannot avoid experiencing lag and delay while in a meeting. Enable HD on Zoom if it's only needed and required.
Now that you have read this entire article, you have learned what Zoom is for and its advantage among other communication apps. Suppose someday you will be using Zoom in your business or any online conference. In that case, you already know how to make a recording in higher resolution. Moreover, if you want to enhance poor-quality video, you know what software you should use. Share this post online if you think it can help other people unfamiliar with Zoom./p>