Apple's AirPlay feature makes it possible to share almost anything – the latest movies, home videos, vacation photos, presentations, music, and more – from your Apple device to your Apple TV or AirPlay 2-enabled smart TV. However, if you want to airplay from iPhone/iPad/iPod to computer that does not support AirPlay feature, you need a third-party application to give you a hand. In this article we will introduce how to mirror and record iPhone/iPad/iPod screen on your computer with AirPlay recorders for Windows and Mac.

One of more frequent requests from Android users is how to record screen on Android. That may be why Google introduced a screen recording feature into Android 10. It means that you can take advantage of the built-in tool to share your gameplay or anything else on your screen if you are using Android Q. Bear in mind that the new feature is hidden by default, so you have to enable it.
5KPlayer is a totally free and safe AirPlay recorder for Windows that can mirror and record anything on your iPhone screen after mirroring it on your PC.
Features:
How to mirror and record iPhone screen with 5KPlayer
Step 1: Connect your iPhone and computer to the same Wi-Fi and launch 5KPlayer on your computer.
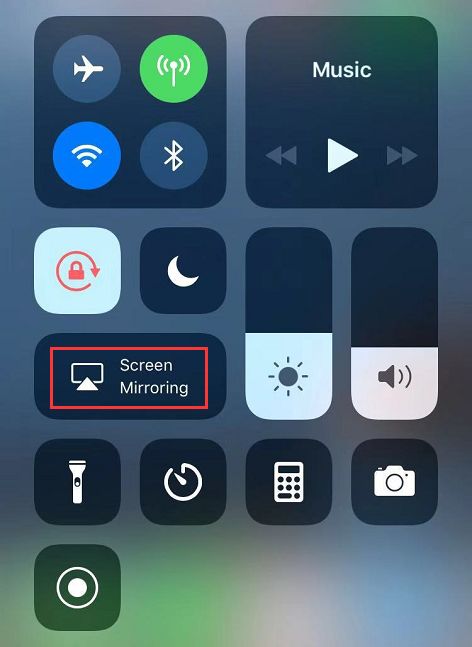
Step 2: Swipe from the bottom of your iPhone to launch the Control Center , tap AirPlay Mirroring or Screen Mirroring option, then it will search for devices automatically.

Step 3: After your computer name has been detected, choose the device name then the display of iPhone will show up on your computer.
Step 4: To record iPhone screen on your computer, just move your mouse to the display on computer and click the red icon to record any activity on your iPhone.

Step 5: If you want to stop recording, just click the gray square icon, then 5KPlayer will pop up and show your recorded video in "AirRecord" playlist with detailed information.
Tip: After recording is stopped, the mirroring is still going on. If you also want to stop mirroring, just go to the Control Center and click the device name that you connected, then choose "Turn Off AirPlay Mirroring".
This iOS Screen Recorder also does a good job in wirelessly mirroring and recording iPhone/iPad/iPod screen on Windows computer. It can stream and record audio, video, and other data from iOS to PC without USB cable. Follow the easy steps below to airplay and record iOS screen on Windows computer.
Step 1: Download and install this AirPlay recorder on your PC.
Step 2: Launch Apeaksoft iOS Screen Recorder on your computer, and make sure that your computer and iOS device connect with the same Wi-Fi.

Step 3: Swipe from the bottom of your iOS device to open the Control Center, turn on "AirPlay Mirroring" or "Screen Mirroring" according to your iOS version. Next find and select "Apeaksoft iOS Screen Recorder" in the searching results. Now you can see your iOS screen on your PC.

Step 4: To record your iOS screen, click the circle button on your computer to start recording. To stop recording, click the circle button again. Then the AirPlay recorder will lead you to the folder where the recorded video saved in. During recording, you are able to adjust the volume, pause and continue recording, turn off/on the microphone, adjust the size of the recording window as you like.
AirServer also enables your computer to receive and display AirPlay streams from your iOS device or mirroring-enabled computer and record what's happening in high quality. This AirPlay recorder also works well for Mac. Unlike the two AirPlay recorders recommended above, AirServer also supports Miracast-enabled Android devices, which means that you can share mirror screens across multiple platforms. Moreover, it can stream more than one device to your receiver, so that you can follow multiple screens without switching between devices.

There is no need to mirror iOS screen to Mac with the help of any third-party software, but you need to connect your iOS device to Mac with a lightning cable. If you have a Mac computer, you can airplay iOS screen to Mac with the help of pre-installed software in Mac: QuickTime Player. Check detailed steps below.
Step 1: Launch QuickTime Player on you Mac.
Step 2: Connect your iOS device to Mac with a USB cable. If you received the message "Trust This Computer?" on your iOS screen, hit the Trust button to allow your Mac to access your iOS screen.
Step 3: On your Mac screen, click to expand the File menu of the QuickTime Player, select New Movie Recording from the menu list.

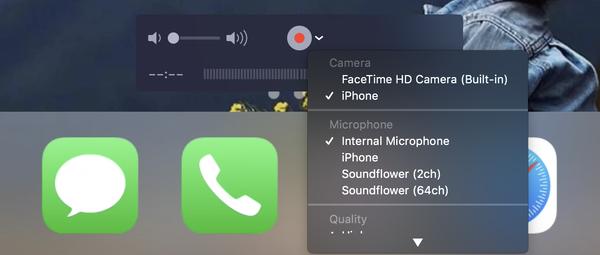
Step 4: A new window will open with a small red button at the center bottom. Please note that by default QuickTime records video from the camera of your Mac which you use for FaceTime, so if you want to record iPhone screen, you need to switch the FaceTime HD Camera to iPhone. Click the small down arrow besides the Record button to pull down the menu where you can find more camera and microphone options. Once iPhone is selected, its screen will be displayed on your Mac instantly. If you need audio or sound input from your iPhone as well, choose your iPhone in the Microphone list.

Step 5: After all settings done, click the Record to start recording your iOS screen on Mac.
If you are also looking for a professional screen recording tool to record video or audio on your Windows or Mac computer, we recommend AnyMP4 Screen Recorder for you.
Secure Download
Secure Download
In this article we have recommended four AirPlay recorders for Windows and Mac for you to mirror and record iOS screen on computer in an easy way. And if you want to record your computer screen activity, we also recommended a professional screen recorder that is named AnyMP4 Screen Recorder. You can give them a try when you have the need.