Emojis are a fantastic method to express our feelings, but GIFs are superior. They go a long way toward demonstrating human reaction in a brief scene and conveying complex ideas quickly. Additionally, it gets more enjoyable when you're your GIF. But how can you create your GIFs on an iPhone? Follow the easy tips below as I demonstrate how to achieve this from your movies or photographs in the following paragraphs. This will use your Photos App to make videos into GIFs and a bonus way to use our PC to make our iPhone images into GIFs.

Live photographs are a favorite feature for the majority of iPhone owners. While they capture a moment in time, they are already on the path to becoming GIFs. Giving them a repeating effect, though, works. One of the simplest ways to convert live images into GIFs is using the Photos app on your iPhone or iPad. This is how. Please ensure the steps to avoid any misunderstanding and problems within the step.
1. On your iPad or iPhone, launch the Photos app. Then, from there, we need to visit the Albums, which are placed under or on the bottom part of the screen.
2. The next step will require us to click Media Types and select Live Photos. From there, we shall now select the live snapshot you want to convert to a GIF.
3. Tap Live Loop in the upper left corner as we finish the process.

Those are the few steps you need to perform to make a GIF out of the live photos on your iPhone. We can see that the Photos App is handy for storing and viewing our images and converting different files into a new format.
It's simple to convert videos into GIFs. But in this situation, you'll require a shortcut to change videos into GIFs. The shortcut converter may then need the line to be trimmed because films are frequently longer than Live or Burst images. Here's how to approach it:
Attention: It can take some time to finish the shortcut. Additionally, it runs erratically on iOS 15.4.
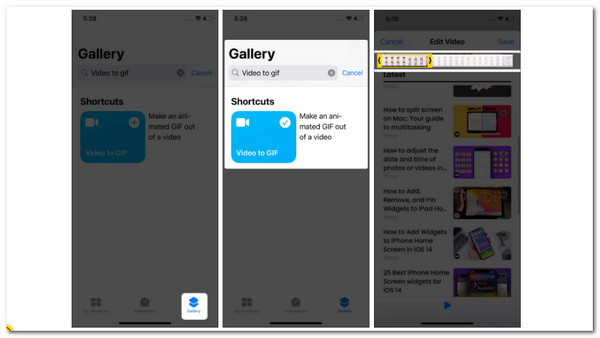
1. Open the Gallery tab in the Shortcut app. From there, we need to click the Plus icon to search for Video to GIF. Next, select the Video to GIF shortcut by going to My Shortcuts.
2. Now, we need to select a video, then crop it using the slider.
3. We shall now click Save. Go ahead and preview the gif before choosing Done or the Share icon.

As was previously said, the shortcut doesn't permanently save the GIF. The following steps can be used to add the action to the shortcut: tap the... symbol in the top right corner of the Video to GIF shortcut; scroll down and hit +; type saves; and then pick Save to Photo Album.
Then you can open the GIF images directly or open it with the GIF player.
To make GIFs on your iPhone or iPad from burst or live photos:
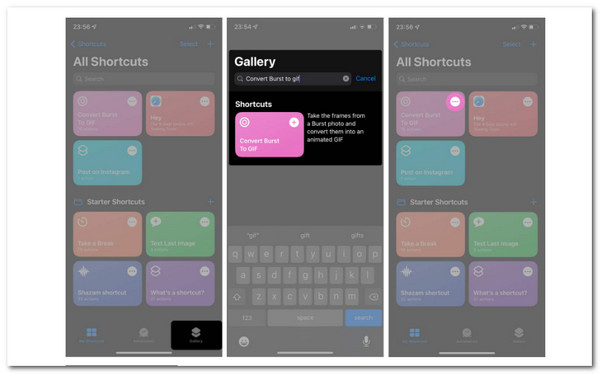
1. Activate the Shortcut app. At the bottom right, click Gallery. Then, find Convert burst to GIF in the search box.
2. This title should now appear in a banner. To add the converter, tap the Plus icon on the banner. Then click My Shortcuts in the lower left corner. The Convert Burst To GIF banner ought to now be visible.
3. For Burst Photos, skip these steps when converting Live Photos to GIFs. At the top right, tap the three horizontal dots.

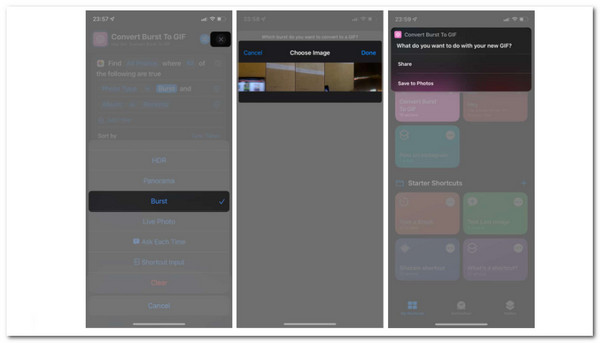
4. Tap Burst next. Then, tap the Close (X) icon after choosing Live Photo. To convert a burst to a GIF, tap the banner. Select the photo you wish to convert, then wait for it to finish.
5. At the upper right, click Done. Choose Share or Save to Photos.
In this way, you can output a GIF image directly, but the GIF size cannot be customized. If you want to change the GIF size, you have to use the GIF resizer to do it.

As we move on to the next medium of converting media files into GIFs, we can also use our computer to make the process possible as long as we have AnyMP4 Video Converter Ultimate. This tool possesses every feature we are looking for in converting our media files. This converting tool allows us to create a high-quality GIF from your photos, videos, and more formats. That is why, in this portion, we will see how we can make it.
Recommendation
1. Get the AnyMP4 Video Converter and install it on your computer.
Secure Download
Secure Download
2. Start this program on your PC and use it. Select Add File or Add Folders by clicking Add File. You could also simply drag numerous video and image files that you want to turn into GIFs into this software.

3. On the right side of the video file, select the format icon. Afterward, a list of settings is seen. In this situation, find the GIF Format.

4. A path should be chosen for the converted files. Click the main screen's Convert All button to edit your computer's video or photo files.

1. On an iPhone, how do you transmit a GIF?
Open the Messages app, select Compose Message, enter the recipient's contact information or select an ongoing discussion. Now, tap Find images and type a term, such as a birthday, to look for a certain GIF. To include the GIF in your message, tap it. At last, taps to send.
2. Can I also create GIFs on Android?
It's also possible to make your GIF if you use Gboard. Even though you won't be able to edit and apply many effects as you can with the original app, you can still make your GIFs. Open any program that lets you type, then select the GIF option by pressing the G key on your keyboard.
3. How can a GIF be made in Photoshop?
Launch the Gallery app, and then long-press several photographs to pick them all. Hit the More button, which is the three vertical dots. Select GIF under Create. Now, examine and modify the generated GIF. Tap Save when you're ready.
Even if numerous pre-made GIFs are available, making your own can significantly improve your communication ability. GIFs are, therefore, simple to create, whether for creating memes or different emotions. You may quickly create your GIFs on an iPhone or iPad by following the above instructions. We hope the guides above will help you create GIf using your iPhone.