It is a good idea to enhance revenue by making videos for vloggers. If you are one of them, you may be familiar with OBS Studio. It is an open-source broadcasting program capable to record gameplay, video tutorial and more. A useful function in OSB Studio is to save recordings. However, many users said that they cannot find the recordings. Therefore, this article will tell you where to find OBS recordings on Windows and Mac.

Generally speaking, OSB Studio will save your recordings to where it is installed on your computer.

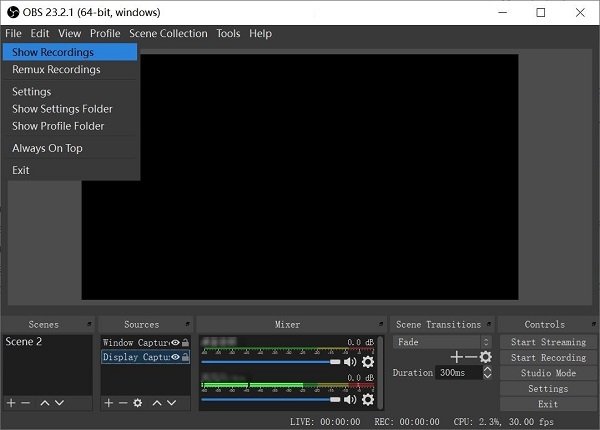
If you cannot find OBS location, open the broadcasting software, go to the File menu and choose the Show Recordings option. Then a file explorer window will pop up and show you all recordings produced by OBS. By default, OBS will save recordings as FLV video files.
The OBS recordings can take up a lot of space on your hard drive if your recording lasts for hours. Moreover, the best way to stop asking where do OBS recordings go is to set the location yourself. Here are the steps.

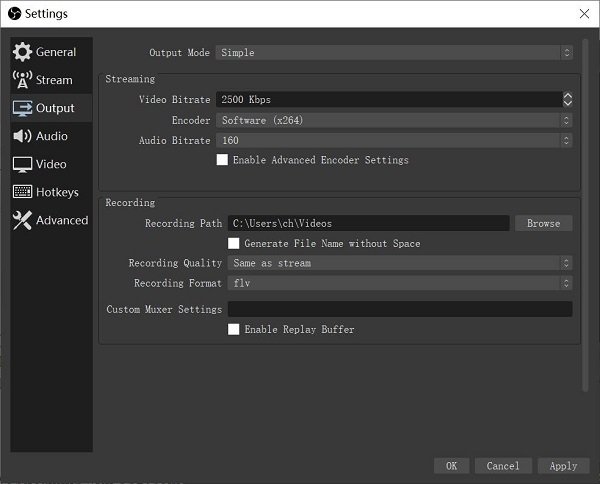
Step 1: Click the Settings button at the bottom right side in OBS Studio. It will open the Settings dialog.
Step 2: Go to the Output tab from the left-hand column and locate to the Recording area.
Step 3: Click the Browse button and then set where OBS saves recordings. Then change other options. Hit OK to confirm it.
However, there are some disadvantages of OBS, like black screen, audio recording stuck, and more. Considering that, we also gather the top alternatives to OBS, so that you can do the smooth recording.
Obviously, it is hard to find where does OBS save recordings. The best alternative solution is to find an easy-to-use screen recorder, such as AnyMP4 Screen Recorder. It provides pro-level functions in the way that everyone can master easily.
Basic Features of the Best Alternative to OBS
In brief, it is the best alternative to OBS and get rid of asking where do OBS recordings go.
Secure Download
Secure Download
How to Record Screen Easily
Step 1: Set up the best alternative to OBS
Launch the Screen Recorder after you installed it to your PC. There is another version for Mac. Pick Video Recorder to open the main interface.
If you wish to set where recordings go manually, click the Settings icon to open Preferences dialog. Go to Output tab, and set Location of temporary files and Location of output files. You can also customize recording format in Video format option. After setting, click OK to close the popup dialog.

Step 2: Record screen
You can get four options in the interface:
Display: Capture everything on your desktop.
Webcam: Add your face to screen recording.
System Sound: Record audio from your system.
Microphone: Capture your voice through microphone.
Turn on or disable each option based on your need. Then click the REC button to start recording your screen.

Step 3: Preview and save screen recording
When recording screen, the Pen tool on the toolbar allows you to add paintings and text in real time. Moreover, you can make screenshots at important moment with the Camera icon. Click the Stop button when screen recording is done.
Then the preview window will pop up. Here you can check the recording video and remove unneeded frames with the Clip tool. Finally, click on the Save button and you will be reminded to set the save path and get all recordings.

AnyMP4 Free Online Screen Recorder is another alternative way to record screen. Similar to OBS, it is totally free to use with no limit. Moreover, it can do what you want without installing any software.
Key Features of the Best Free Screen Recorder
How to Record Screen Online for Free
Step 1: Open https://www.anymp4.com/free-online-screen-recorder/ in a browser. Click the Launch Free Recorder button to get the launcher.

Step 2: Click the Gear icon to open the Setting dialog. Click the Folder icon at the bottom right side to set the Location of output files. Customize other options and hit OK to confirm it.

Step 3: To record screen along with audio, turn on Monitor and System sound icons, and set the recording area. If you want to add your face and voice to the recording, enable Webcam and Microphone as well.

Step 4: Click the REC button. Once the countdown ends, screen recording will begin. When recording is complete, hit Stop to save it directly.
Does OBS record audio?
OBS is able to capture audio from your system and through microphone along with screen recording, but you need to set it up correctly. If your recording is mute, you need to check your device and setting in OBS.
How do I play OBS recordings?
OBS recordings are saved as flash video files and you can play them in any media player, such as VLC.
How to convert OBS recordings to MP4?
By default, OBS save your recordings in FLV format; however, you can change the output format to MP4 in Settings dialog in OBS. If you already get the FLV recording files, you will need a video converter to do the job.
This guide has told you where to find OBS recordings on Windows, Mac and Linux. It is annoying if you cannot find the recordings in OBS. The good news is that you can check and set location manually. Many people complained that OBS is difficult to learn. AnyMP4 Screen Recorder is an easy alternative to record your screen and find the recordings quickly. AnyMP4 Free Online Screen Recorder is the online alternative to OBS. If you have more questions, please leave a message below this post and we will reply it as soon as possible.