Compared with traditional online music downloaders, using an audio recorder is a better choice. You can record any popular audio into MP3 and other formats with the original quality. The success rate is 100%. Even though some music sharing platforms don't support music downloading, you can still record audio files for offline playback.
To record music playlists or other audio files for hours, you can use an audio recorder with timer to solve the problem. By setting the start and stop time, the audio recorder will start and stop recording audio from your computer automatically. The recorded audio file will be saved as MP3, M4A and other popular formats directly. Just leave your computer alone during the entire audio recording process. The MP3 audio recorder with timer can record sound and voice in one stop.

There is a built-in task schedule feature in AnyMP4 Screen Recorder. You can set a timer for your video or audio recording. According to your personalized timer, the screen recorder can start recording video or audio at any time from Sunday to Saturday. Once it reaches to the stop end, the scheduled recording will stop instantly. If you go out, you can even set to shut down when end recording. The MP3 recorder with timer is a great help, especially when you record audio for a long time.
Secure Download
Secure Download
To record MP3 audio with a timer successfully, you need to keep your computer not in sleep or lock mode. AnyMP4 Screen Recorder will save the audio recording and shut down the computer once the recording process ends. So just feel free to use the screen recorder with timer as the following shows.
Step 1: Free download, install and launch AnyMP4 Screen Recorder. Choose Audio Recorder for further scheduled audio recording.

Step 2: Turn on System Sound to record audio coming from your computer. If you want to add your voice, you can turn on Microphone too.

Step 3: To activate the audio recording timer, click Task Schedule on the bottom.

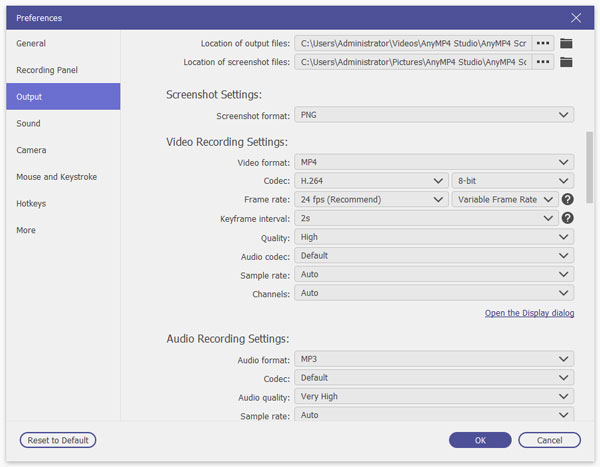
Step 4: MP3 is the default output audio format. Or you can click Settings and enter into the Preferences Output section to change it. By the way, you can set the output audio quality with multiple options. Click OK to confirm and move on.

Step 5: Click REC to start recording audio on your computer. When the MP3 audio recording process ends, you will be in the Preview window. Click Play to have a check. At last, click Save to export your audio recording file as MP3 format. (Find MP3 trimmer here)

How many hours can you record with a timer?
There is no fixed answer. It depends on the available storage space and battery power. If possible, you can set the scheduled audio recording for hours or even days.
Can you set a scheduled screen capture?
You can use a task schedule to record screen video with a timer. But there is no timer for screen image capture. If you really want to take a screenshot while recording, you can click Screenshot or use hotkeys to make a screen capture instead.
Can you record audio with Audacity timer?
Yes. In the Audacity Transport list, choose Recording followed by Timer Record. Here you can set the start date and time, end date and time and other details. After creating a timer record, you can start the audio recording as usual. That's how to record audio with Audacity free audio recorder with timer.
These are all you need to do to complete the scheduled audio recording process. You can use the above MP3 recorder with timer to record online and offline music with ease. That's all to do a scheduled screen audio recording. If you have any other questions, you can feel free to contact us.