Unlike other smartphone brands, Apple has built up a complete technology world, from iPhone to iPad, from MacBook to Apple TV. More importantly, you can sync messages from iPhone to Mac along with other data. Today, more and more users are owning multiple digital devices including smartphone, tablet, laptop and computer. It makes sense that data syncing is so important. This article focuses on how to get your iPhone messages and iMessages to Mac.

Sometimes, Apple’s service is not enough to sync messages from iPhone to Mac, especially transfer specific messages or iMessages. On the other hand, AnyMP4 iPhone Transfer Pro for Mac can meet your need.
Secure Download
Secure Download
In short, it is the easiest way to transfer text messages from iPhone to computer running macOS.
Step 1: Install iPhone Transfer Pro for Mac
Make sure to download the text message transfer for iPhone and install it on your Mac. There is another version for PC. Next, connect your iPhone to the computer with the Lightning cable and launch the software. Your device will be recognized automatically.

Step 2: Preview messages on iPhone
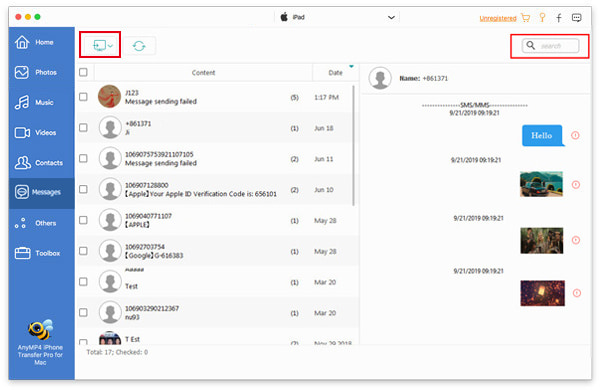
After data scanning, go to the Messages tab from the left hand column and you can see all conversations on your iPhone. Click a conversation and you will be presented all messages and attachments.
Tip: To quickly locate a message or conversation, you can enter a keyword in the search bar at the upper right corner of the screen.

Step 3: Transfer iPhone messages to Mac
Select the messages that you want to sync to Mac, click the Computer icon on the top ribbon, and choose your Mac. In the popup dialog, navigate to a specific folder to save the messages and start syncing. According to our research, it only takes a few minutes to complete the process.
Note: The biggest advantage of the message transfer software is to let you completely control message syncing between iPhone and Mac.

If you do not like third-party software, some utilities released by Apple can help you to sync messages from iPhone to MacBook and other devices simply.
iTunes may be the first tool emerges in your mind when talking about syncing data from iPhone to Mac. Unfortunately, iTunes cannot sync messages from iPhone to Mac separately. Instead, you can make a backup for iPhone using iTunes including messages.
Step 1: Plug iPhone to your MacBook or other models with a USB cable. Then launch the latest version of iTunes, click the Device icon at the top left side.
Step 2: Go to the Summary tab and locate the Backups section.
Step 3: Make sure to select This computer and click the Back Up Now button to get iPhone messages to Mac.
Note: iTunes will encode iPhone backup files with unique technology. The only way to read the messages in backup file is to restore it to your iPhone.
The iCloud offers a convenient way to connect iPhone messages to Mac. It works through the internet connection and sync messages in two-way. However, it has several requirements. Firstly, you need to sign in the same Apple ID on both iPhone and Mac. Plus, you must have enabled two-factor authentication. Your iPhone should run iOS 11.4 or above and computer should run macOS 10.13.5 or later. Moreover, both iPhone and Mac computer should connect to a network, no matter it is a Wi-Fi network or cellular data.
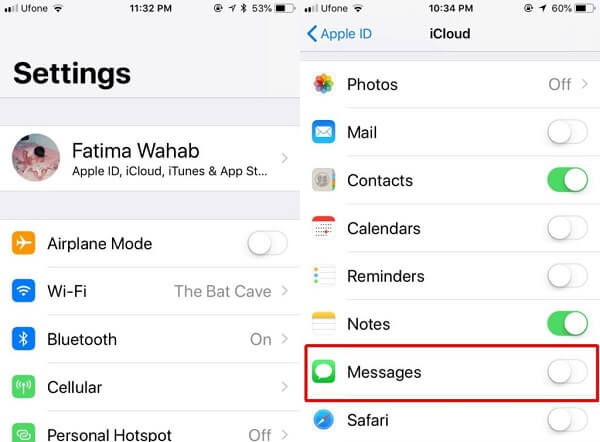
Step 1: On iPhone, go to Settings > [your name] > iCloud, and toggle on the Messages option.

Tip: It usually takes a while to back up your messages to iCloud. Moreover, you need to make sure your device is connecting to a good network.
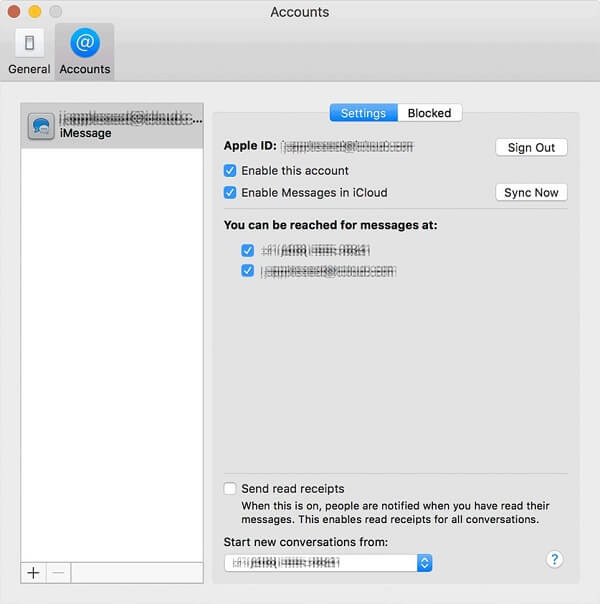
Step 2: On Mac, open the Messages app, head to Messages > Preferences on the menu bar. Go to the Settings section in the Accounts tab.
Step 3: Tick the checkbox next to Enable Messages in iCloud and click the Sync Now button. Now, the messages should sync between your iPhone and Mac.

iMessage is the free message service developed by Apple for customers to communicate with each other. You can get iMessages on crossing iPhone and Mac. The steps below can help you sync iMessages from iPhone to Mac quickly.
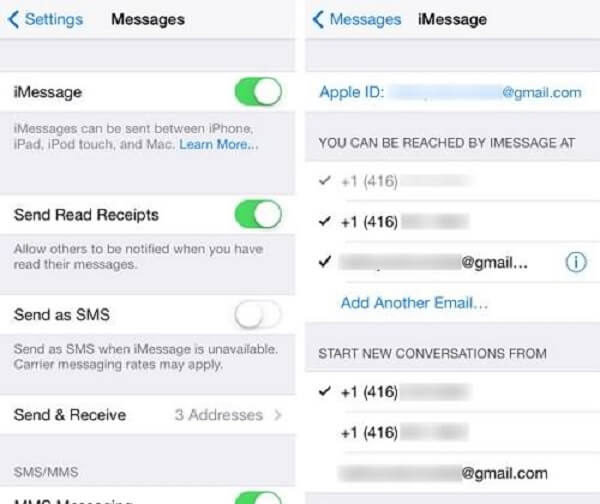
Step 1: On iPhone, head to Settings > [your name] > Messages > Send & Receive. Make sure the Apple ID is the same with the one used on Mac.
Step 2: Then select the phone number and email addresses under You Can Be Reached By iMessage At. Choose your phone number under Start New Conversations From.

Step 3: Switch to your Mac and launch the Messages app. Open the Preferences dialog, and go to the Accounts tab. Choose your iMessage account on the left side, sign in the Apple ID associated on iPhone, and check Enable this account.

Step 4: Next, tick the phone numbers and email addresses under You can be reached for messages at, and select your phone number in the dropdown list of Start new conversations from.
Now, the iMessages sent and received on iPhone will be synced to Mac automatically.
This article shared four ways to sync messages from iPhone to Mac including standard messages and iMessages. For multi-device users, you must understand how to transfer your messages crossing iPhone and MacBook Pro/iMac and more. AnyMP4 iPhone Transfer Pro for Mac, on the other hand, can help you simplify the process. Encounter troubles when syncing messages? Please leave a message below.