Part 1: How to Remove Audio from Video with AnyMP4 Video Converter Ultimate
To mute audio from a video, you need a video editor that can edit audio. Sometimes, a video may contain more than one audio track. Can you only mute one audio track but keep others? AnyMP4 Video Converter Ultimate is just the tool that you need.
Recommendation
- Remove audio from a video in one click.
- Support almost all video and audio formats.
- Use a new audio track for a video easily.
- Protect your video quality while editing.
How to Remove Background Music from a Video on PC
1.Open the video
Fire up the best video and audio editor once you install it on your PC. It is compatible with Windows 10/8/7, with another edition for Mac users. Click and expand the Add Files menu at the top left corner, and choose to Add Files or Add Folder to open the video you want to edit. To batch removing audio from videos, you can open them together.

2.Mute audio from video
There are two ways to mute audio from a video:
If you intend to remove all audio tracks from the video, pull down the audio menu, and select Audio Track Disabled. Now, the video becomes mute.
To remove one audio track but keep others, click the Edit button under the video title. The video editor window will pop up. Switch to the Audio tab and locate the Audio Track area. Click the drop-down list and choose the desired audio track. Next, enter 0 to the Volume box. Click the OK button to confirm the changes.

3.Save mute video
Finally, click the Folder button at the bottom of the home interface, and set the destination. Click on the Convert All button to export the video. The Convert All to menu at the top right side is used to change the video format.

Aside from removing audio from a video, this tool can be used to add audio to screen recording, delay audio, combine video and audio, and more.
Part 2. How to Remove Audio from Video with Canva
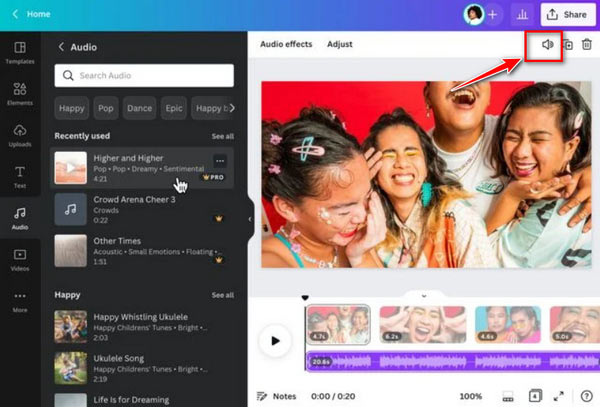
Canva is a free platform that allows you to create all kinds of amazing videos with sound or soundless. It provides a wide range of editing tools, templates, and stock images. Due to its user-friendly interface, you can easily remove audio from a video. Here are the steps for you.

1.Launch the audio remover and upload a video from that want to remove audio.
2.Select the audio track from your video, then click the Speaker icon in the window's top right corner. Then, you can click the Mute icon to remove voice and audio from the video directly. Or move the slider to the left side to adjust the volume.
3.Preview the video to ensure the audio has been removed. Finally, click Download to save the soundless video in your desired format.
Following these simple steps, you can remove audio from your video using Canva.
Part 3. How to Remove Audio from Video with Premiere Pro
Adobe Premiere Pro is a professional audio remover from video. It lets you mute a video with a few clicks. Learn the following steps to remove audio from a video.

1.Go to File and click New to create a new project.
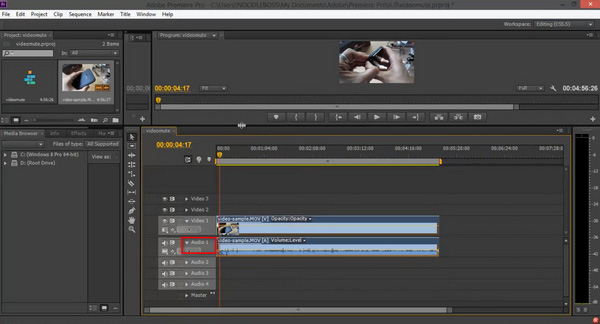
2.Import the video from which you want to remove audio by going to File and clicking Import. Once your video is imported, drag it from the Project panel to the Timeline.
3.Select the video layer from the Timeline. Right-click it and select Unlink from the drop-down option. Then, you can separate the audio and video tracks.
4.After the audio track is separated from the video, you can select the audio track. Next, press the Delete button on your keyboard to remove it.
5.Go to File again and select Export. Finally, click Media to save the changed video without audio.
Your video is now free from any audio using Adobe Premiere Pro. Next, if you want to edit the video, you can read about how to split screen in Premiere Pro.
Part 4. How to Remove Sound from Video with QuickTime
QuickTime is the built-in media player on Mac. In addition to MOV playback, it also provides the bonus functionalities, such as removing audio from video, removing the video from audio, etc. Although it can only open limited video formats, it is available to MOV and a part of MP4. You can follow the steps below to streamline the process.
1.Navigate the video file that you want to edit on your hard drive. Then open it with QuickTime. If it is the default media player, double-click on the video to open it.

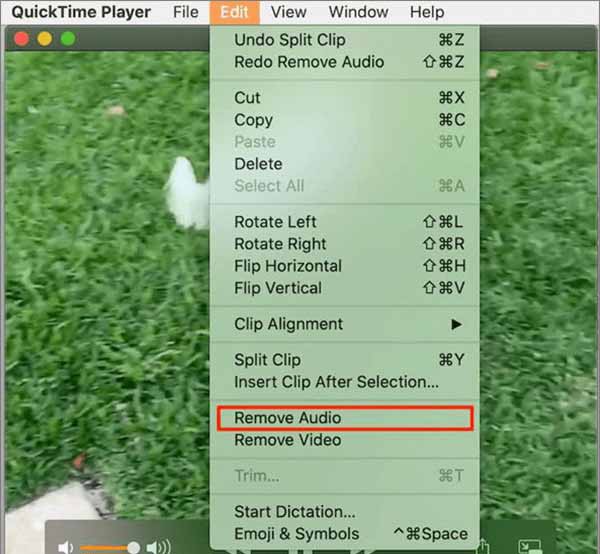
2.Click and expand the Edit menu on the top menu bar, and choose the Remove Audio option. Now, play the video and you will find the background music is removed from the video.
3.Export the mute video as a new file.
Part 5. How to Remove Audio from Video with the Photos App
How to Remove Audio from Video on iPhone
On iPhones and iPads, the preinstalled Photos app can mute a video easily. Moreover, it does not really remove the audio track but turns off the volume. Therefore, you can get back the audio at any time.

1.Run the Photos app from your home screen. Find the target video that you intend to mute, and open it.
2.Tap the Edit menu at the top right corner. Then the video will be put on the timeline, and there is a yellow Speaker icon.
3.Press the Speaker icon to remove background audio from the video. Tap Done at the bottom right side to save the video.
Part 6. How to Remove Audio from Video with the Google Photos App
How to Remove Background Music from Video on Android
For Android users, the Google Photos app is the easiest way to remove background audio from video. Some Android users back up their photos and videos to the service. Moreover, it provides a simple video editor. If you have a Google account, you can get a 15GB free storage capacity.

1.Make sure to connect your Android phone to a Wi-Fi network. Run the Google Photos app and sign in to your account.
2.Switch to your Gallery app, and locate the video that you intend to edit. Tap the Share icon and select Google Photos to upload it.
3.Turn to the Google Photos app and find the target video. Tap the video to open it. Press the Edit button at the bottom to enter the next screen.
4.Tap the Speaker icon at the bottom to mute the video immediately. At last, save the mute video to your account.
Part 7. How to Remove Audio from Video Online
Another way to remove audio from a video is the online video editor app, such as MP4COMPRESS. It can remove sound from an MP4 video without installing any software. Moreover, most web apps are free to use. It is a good choice for beginners.
1.Visit https://www.mp4compress.com/mute-video/ in a browser when you need to mute a video online.
2.Click the Select file button and upload the video that you want to edit. The web app accepts an MP4 video file up to 500MB.

3.After uploading, the web app will remove audio from the video automatically. When it completes, you will be presented with the download link. Click the Download File link and save the mute video to your disk.

Part 8. FAQs of How to Remove Audio from Video
Can I edit the audio of a video separately?
Firstly, the video file should store the video and audio on two tracks. Moreover, you must have a video editor that supports multiple tracks. Then you can open the video file and only edit the audio.
How do I normalize audio in a video?
To do this, you need something that can process audio and boost the levels. You can extract the audio from a video, and normalize it in an audio editor, like Audacity.
How to remove background music using Audacity?
Audacity is an audio solution. It cannot open video files or remove background music from a video.
Can I remove audio from the video in VLC?
Yes. VLC is a desktop software for video editing and playing. Click Wrench next to the video profile drop-down option to enter the Profile window. Select the Audio codec panel and uncheck the box next to Audio in the top corner. Then, you will exclude the audio from the video and convert it.
Conclusion
Now, you should learn at least 7 easy ways to remove audio from a video on a computer and mobile device. So that you can get rid of the noise or the original background music from the video. If you have a computer, AnyMP4 Video Converter Ultimate is the best option. The output quality is impressive. For more questions, please feel free to write down your message in the comment area below this post.


