While watching a movie on a media player, sometimes the audio might be out of sync. That is because there might be a small lag between the audio track and the video. This can be frustrating when you are watching your favorite video. In order to sync the audio correctly to the images, you can set audio delay with a proper tool. This guide shows you how to do it using VLC and more.

AnyMP4 Video Converter Ultimate is one of the best video and audio editing software on PC and Mac. It designs the pro-level functionalities in a way that everyone can learn quickly.
Key Features of the Best Video and Audio Editor
Secure Download
Secure Download
Step 1: Open a video
Install the best video and audio editor when you encounter the problem that audio is out of sync. Then launch it, click and expand the Add Files menu, and choose Add Files or Add Folder to open the target video. If you have multiple videos to edit, open all of them.

Step 2: Delay audio
Click the Edit button with a magic-bar icon under the title. Then the video editor window will show up. Switch to the Audio tab from the top ribbon. Pull down the Audio Track option and select the wired audio if the video includes multiple audio tracks. Next, move the Delay slider until you get the desired audio delay effect. You can also adjust the volume of the audio track. Click the OK button to confirm it.

Step 3: Save the video
Go back to the home interface, and click the Folder button to set the destination folder in the Save to box. At last, click on the Convert All button to export the video.

Note: If you intend to convert the video to another format, click the Convert All to menu at the top right side and set it on the profile dialog.
As a free media player, VLC comes with a wide range of bonus tools, including audio delay. However, the procedure is a bit complicated. You can follow the steps below to get the desired effect.

Step 1: Open the video in your VLC Media Player.
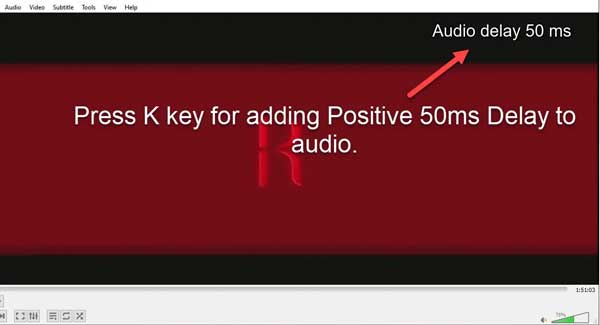
Step 2: To get negative delay audio, press the J key on your keyboard. If you want to add a positive delay to audio, press the K button.
Every time you press the keys, a 50ms delay is added to the audio track.

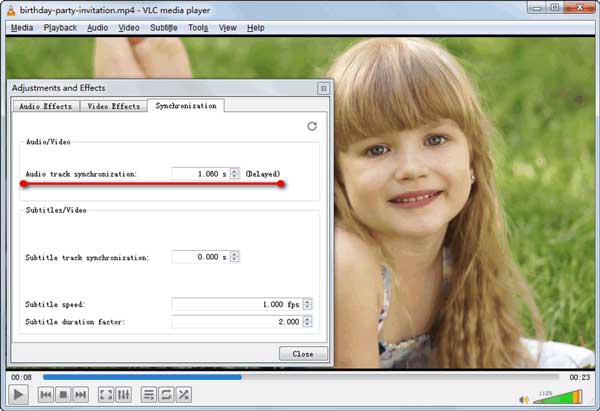
Step 1: Add the video in VLC, head to the Tools menu, and choose Effects and Filters.
Step 2: Go to the Synchronization tab, and enter the audio delay value in the Audio track synchronization box under the Audio/Video section.
Step 3: Click the Close button and enjoy the video.

Step 1: Also, open the target video in VLC.
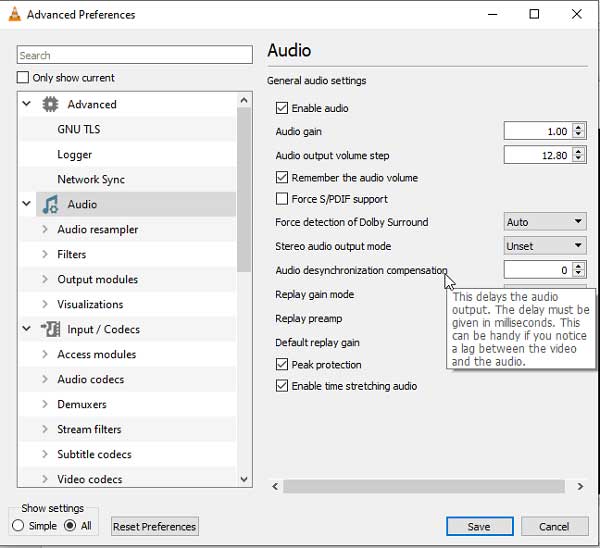
Step 2: Go to the Tools menu on the top menu bar, and choose the Preferences option to activate the Advanced Preferences dialog.
Step 3: Select the All option under the Show settings at the bottom-left side.
Step 4: Click and unfold the Audio entity on the left panel and set the audio delay in the Audio desynchronization compensation box. Hit the Save button to confirm it.
What causes the audio delay in a video?
There are a number of circumstances that can cause the audio and video to be out of sync. When watching a TV program, it could be the broadcast itself or a bad internet connection. If a DVD or Blu-ray disc player is connected, a poor connection or the disc itself could be the cause.
How do I fix the audio delay on my TV?
Make sure to update the software installed on your TV. Moreover, check the cable or internet connection if you are watching the live streams.
Why is VLC not playing audio?
Sometimes, it may be due to the incorrect sound setting of your computer, or the VLC audio setting is improper. You can use another computer or other media player to listen to the audio file.
Now, you should understand how to adjust audio delay with VLC on PC and Mac. It allows you to do it temporarily and permanently. You can follow our steps to get the desired effect quickly. Plus, AnyMP4 Video Converter Ultimate is easier to use than VLC. If you have other questions related to VLC, please leave a message below.