iMovie is the built-in movie maker app on Mac. It provides the basic video editing features, like adding an audio track to a video. It is wired that an audio track suddenly begins along with the video. Fortunately, iMovie offers the fade-in-and-out effect. This tutorial will explain how to fade audio in iMovie to make your audio track even better to work with the images.

iMovie provides several transitions to make a movie smooth. The fade effect is similar to the transition for audio tracks. There are two basic types of fades, fade-in, and fade-out. The former begins with a slice when an audio track begins, and eventually rises to full volume. The latter starts at full volume and decreases slowly into silence. Now, let's learn how to fade in and out audio in iMovie on Mac.
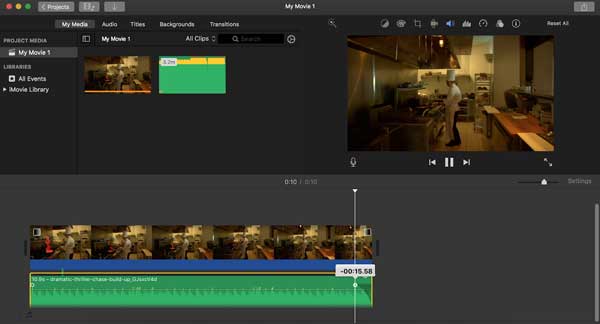
Step 1: Create a new project or open an existing project in iMovie. Next, drag and drop the target video into iMovie, and place it onto the timeline.
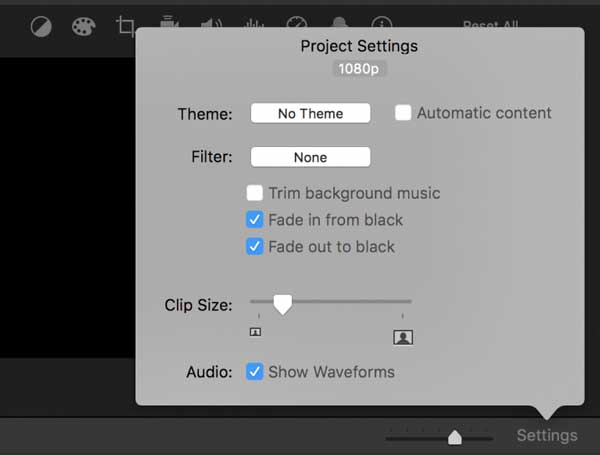
Step 2: Click the Settings button at the bottom to run the Project Settings dialog, and check the box next to Show Waveforms. Now, the audio track will enter the wave mode.

Step 3: Now, you will see the fade handles at the beginning and the end of the audio track. They are small white circles on the audio strip. By dragging these circles, you can make audio fade in and/or out in iMovie.

Step 4: Next, play the video to check if the effects are working as you wish. Then adjust them until you are satisfied. Finally, click the Share icon at the top right side, and choose a channel to export the video. The File option is used to save the video to your computer.
Note: In addition to the fade handles, you can also do audio fade out in iMovie on the Audio Inspector dialog. Double-click the video clip, and choose Clip Adjustments to open the Audio Inspector dialog.
If you are looking for an alternative to iMovie on PC, AnyMP4 Video Converter Ultimate is the best choice. It is as easy to use as iMovie, but more powerful on video and audio editing on PC and Mac.
Key Features of the Best iMovie Alternative
Secure Download
Secure Download
Step 1: Add a video
Run the best alternative to iMovie after installing. It is compatible with both PC and Mac. Go to the MV window from the top of the interface. Click the Add button above the storyboard and add a video or photos that you want to use.

Step 2: Fade audio
Head to the Setting panel on the left side, and locate the Audio Track section. Now, you can decide to Keep original audio track or add new Background Music and add the audio track from the library or your hard drive. Then adjust the Volume and Delay until you are satisfied. Next, check the boxes next to Fade in and/or Fade out according to your need. Pre-listen to the effect with the media player on the right side.

Step 3: Export movie
Pull down the profile menu under the media player, and select a proper video format and resolution. Go to the Export panel, set the filename and destination folder, and click the Export button.

What is the fade handle in iMovie?
According to Apple, the fade handle is commonly used audio transitions. In the iMovie app on your Mac, position the pointer over the audio portion of a clip in the timeline and the fade handles will appear.
What specific effects can you do in iMovie?
In addition to sound effects, iMovie also has other useful video effects and filters. With your project open, click the Filter icon at the top of the interface, then you can see all filters.
Can I reduce the volume gradually in iMovie?
iMovie will set the fade-in and fade-out effect randomly by increasing the audio volume at the beginning of the clip and decrease the volume at the end of the clip.
Now, you should understand how to fade audio in and out in the iMovie app on Mac. The workflow is not very intuitive, but you can get the effect with our guide. AnyMP4 Video Converter Ultimate is the best iMovie alternative for PC users to add fade-in and fade-out effects to your movie. If you have other problems, please leave your message below this post and we will reply with it quickly.