This guide will talk about a hidden feature in VLC, screenshot. As a media player, VLC support almost all video and audio formats. However, it is far more than a simple media player. Users can get extensive bonus tools within the same application, like screen record and screenshot. According to a recent survey, a lot of users have not used the screenshot function in VLC because they do not know it at all. That is why we share the guide below.

If you already have VLC on your computer, it is a simple option to take screenshots. Even if you do not have it, you can get VLC for free from the official website.

Step 1: Open VLC, drag and drop the video into the media player window.
Step 2: Play the video until you see the desired frame and press the Pause button.
Step 3: Go to the Video menu and choose Snapshot. By default, the snapshot will be saved as a PNG file.

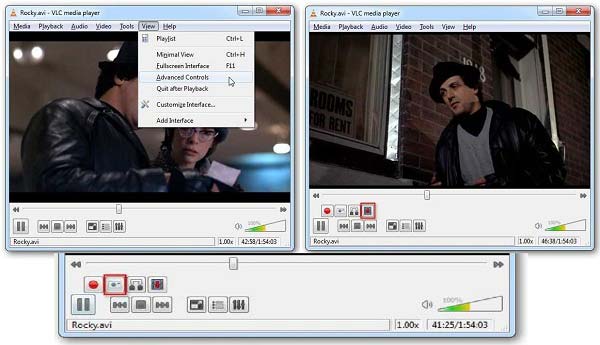
Step 1: Run VLC, go to the View menu on top ribbon and make sure to check Advanced Controls. Then you will get more buttons at the bottom left side.
Step 2: Press the Frame by Frame button to locate the frame you wish to screenshot in VLC.
Step 3: Then hit the Snapshot button with a camera icon to do it quickly.
Note: When a snapshot is taken, VLC will display it as a thumbnail briefly with the filename and the path.
By default, VLC saves screenshots as PNG files. The good news is that you can set the options involved with screenshot in VLC.

Step 1: Go to the Tools menu on the top menu bar and choose Preferences option. It will open the Preferences dialog.
Step 2: Head to the Video tab and locate the Snapshot section. If you cannot find it, switch All from Simple at the Show settings area.
Step 3: Click the Browse button and set a specific folder to save screenshots. Then change Video snapshot format between png and jpg. Plus, you can adjust width and height of snapshots.
Step 4: After setting, click the Save button to confirm the setting. Then VLC will screenshot based on your preference.
VLC can only take screenshots for video playback. If you want to screenshot other windows or desktop, you have to look for a specific tool, such as AnyMP4 Screen Recorder. It lets you take screenshots on any area for free with no limit.
Key Features of the Best Screenshot Tool
Needless to say, it is the best alternative to VLC to take screenshots on PC and Mac.
Secure Download
Secure Download
Step 1: Set up screenshot tool
When you wish to take a snapshot, download and install the best alternative to VLC on your PC. There is another version for Mac. Put whatever you wish to snapshot on your desktop and choose Screen Capture.
Tip: If you want to set custom options, click the Menu icon and open the Preferences dialog. Go to the Output tab and set the options related to screenshot, like Location of screenshot files, Screenshot format, etc.

Step 2: Take a screenshot
Now, your mouse will turn to a cross. Click upper left point of the desired area, keep press your mouse and drag it to cover the entire area. Once you release your mouse, the edit window will show up.

Step 3: Edit and save the screenshot
There are several tools on the edit window:
To add shapes to the screenshot, select a shape and your favorite color, and place it to the proper position.
Better than VLC, you can Graffiti the snapshot. Select the Pen tool and set the color. Next, draw on the screenshot directly.
Apply text to snapshot. Choose the Text tool, and then customize font, size, and color. Click on the snapshot and enter the texts.
After editing, click the Save icon on the right panel and the screenshot will be save according to your setting. Alternatively, click the Clipboard icon to copy it to your clipboard.

Not only working as the alternative to VLC to capture the screenshot, this software can also do the great job to record video as the replacement of VLC. (VLC not recording?)
Where are VLC screenshots saved?
By default, snapshots made by VLC will be saved in My Pictures folder on PC, in Desktop on Mac, and $(HOME)/.vlc/ on Linux. However, you can change the location in the Preferences dialog in VLC. You can find it in Tools menu on the top ribbon.
What is the keyboard shortcut to screenshot in VLC?
In addition to menu and advanced controls, you can also take a screenshot in VLC using hotkey. The button combination is Shift + S on Linux, Unix and PC. When it comes to Mac OS X/11/12, simply press Command + Alt + S and VLC will snapshot current frame immediately.
Is VLC Media Player safe to use?
Generally speaking, VLC is an open-source project and safe to run on your system. However, some malicious media files may try to utilize the bugs in the application to invade your computer. You'd better use the antivirus software on your machine.
This guide has told you how to take a screenshot in VLC and how to set the options involved. Sometimes, you may capture an image from your favorite movie for sharing online or editing further. VLC can meet your need in two ways. If this function is too complicated to you, try the best alternative, AnyMP4 Screen Recorder. It is not only easy to use, but also offer more useful tools. More questions? Please feel free to leave a message below.