Are you searching for a simple way to copy a home-made DVD onto your Mac?
For different reasons, especially because new Mac devices don’t carry a DVD drive anymore, you want to make a copy of your homemade DVD on Mac hard drive, for backup and better archiving. Now we back to the question, how to copy homemade DVD to Mac hard drive?
Here in this post, we like to give you a detailed guide to copy and save homemade DVD contents to the internal or external hard drive of your Mac. We mainly talk about home-made DVDs.

If you need to copy your DVD files to Mac, DVD Copy for Mac is undoubtedly your best choice. Trusted by many users all over the world, it has always been at the forefront of the market in terms of its level of DVD copying. It can safely export the contents of your DVD and copy them to the selected destination. In the process, your files always remain in their original quality. You can also use the video editing tools provided within the program to edit the copied video.
Secure Download
Secure Download
1. Download and install AnyMP4 DVD Copy for Mac on your computer. Open it, and insert the DVD into the DVD drive of your computer.
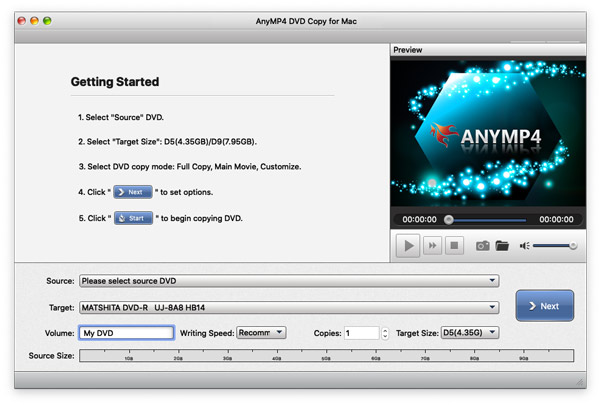
2. Click File on your Mac and select Select Source to find your target DVD.

3. There are 3 modes of DVD Copy for Mac to choose from. You can select depending on your needs.
Full Copy: Copy all content of the DVD video.
Main Movie: Copy the main movie without superfluous clips.
Customize: You can select which video clips are burned.

4. Click Next to adjust the DVD settings. You can edit the DVD menu, titles, region code, etc.
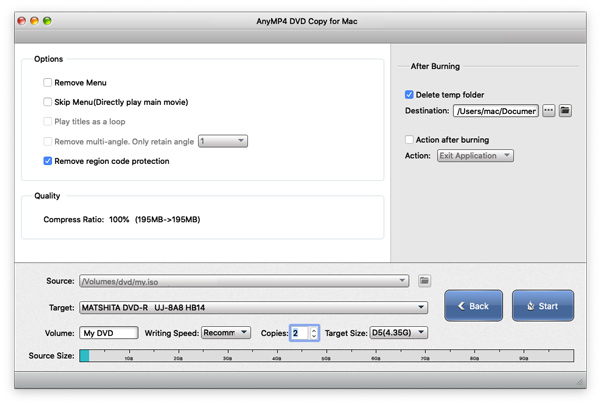
5. After finishing all the settings, click Start.
To import homemade DVD to Mac, you can rely on the Disk Utility. It is a built-in system utility designed for performing various tasks related to Mac hard disks and storage devices. You can use it to rip and download homemade DVDs to your Mac. Disk Utility is only workable for homemade DVDs.
1. Insert your homemade DVD dick into your Mac's DVD slot. If your Mac doesn't have a DVD drive, you need to connect an external drive. After that, your Mac will automatically launch the DVD Player and the homemade DVD will be mounted on the Desktop.
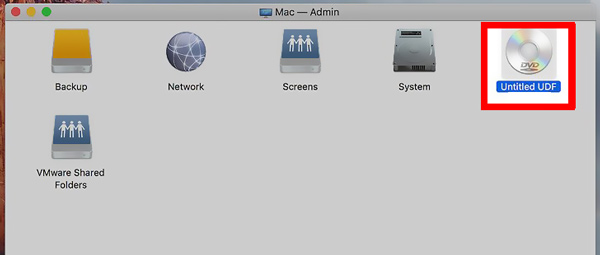
2. Now you should open Disk Utility. You can click Disk Utility in the Dock and then type Disk Utility in the search field to quickly locate it. Click its icon to open it.

3. There should be two discs displayed in the left panel of the Disk Utility. Click your DVD name under the External header. Click on the top File menu, select the New Image option, and then choose the Image from [DVD name].

4. In the pop-up window, you can rename the file, select a destination folder, set the format and encryption. After that, click on the Save button.
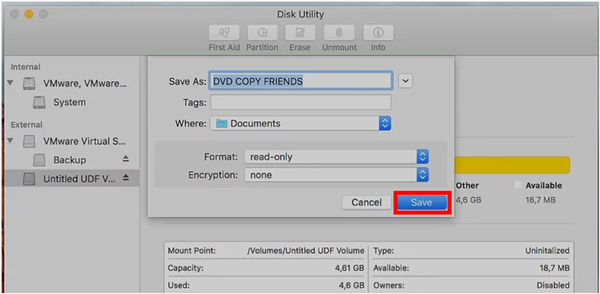
With the operations above, Disk Utility will rip your homemade DVD and create an image file with a .CDR file extension. After you copy the homemade DVD to your Mac hard drive, you can eject your homemade DVD from the drive.
Besides the method above, you can also choose a professional DVD ripper to make a DVD copy on a Mac hard drive easily. Here, we strongly recommend the all-featured Video Converter Ultimate for you. It is specially designed to deal with all kinds of video and audio conversions. It enables you to rip and convert a DVD to a digital file on both Mac and Windows 11/10/8/7 PC.
Secure Download
Secure Download
1. First, insert the DVD into your Mac. Similarly, if you are not using an old Mac with a DVD slot, connect an external DVD drive.
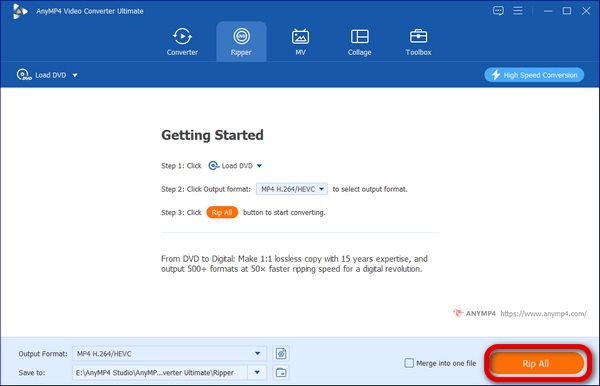
2. Free download and launch this DVD-ripping software on your Mac. When you enter it, choose the Ripper feature. Click on Load DVD and then select the Load DVD Disk option.

3. When your DVD is loaded into this software, you are allowed to edit the DVD movie. Here, you can click the Edit or Clip button to start editing your DVD.

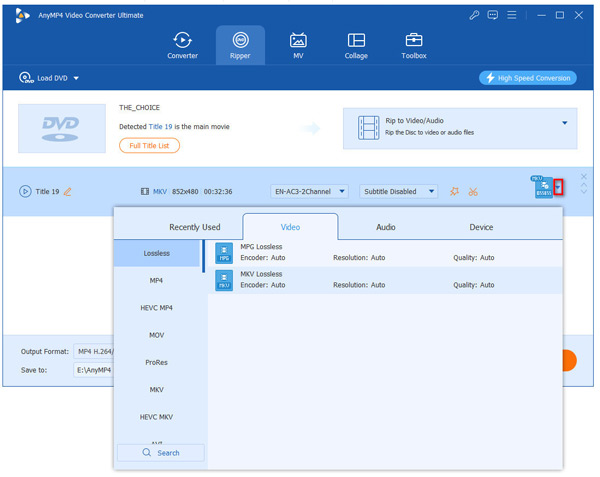
4. After the DVD editing, you can click on the Rip All button to make a copy of this DVD on your Mac hard drive. The output format is set as the MPG Lossless by default to preserve the lossless output quality and the original DVD structure.
If you want to convert a DVD to another digital format, you can select the suitable one from Rip All.
As mentioned above, this DVD ripper is compatible with Windows 11/10/8/7 PCs. So, if you have an old Windows PC with a DVD drive, you can choose to rip your DVD to AVI video on it and then copy the converted DVD file to your Mac.
In this article, we have mentioned three of the best tools for copying DVDs on Mac, including AnyMP4 DVD Copy for Mac, Disk Utility, and AnyMP4 Video Converter Ultimate. We will test these three tools and attach a comparison table. You can refer to the data in the table below to see which one is more suitable for you.
Considering that the output formats supported by the three tools are not the same, we choose the output format with high parameters to ensure the quality of the copy. Here is an example of a 7.75GB DVD movie, and give the method test result as follows:
| AnyMP4 DVD Copy for Mac | Disk Utility | AnyMP4 Video Converter Ultimate | |
|---|---|---|---|
| Output Format | DVD folder or DVD ISO image files | CDR file | MP4 H.264/HEVC |
| Output Quality | Original Quality | 720x480(16:9) | 1920x1080 |
| Copying Time | About 19 minutes | About 27 minutes | About 15 minutes |
Since AnyMP4 DVD Copy for Mac and Disk Utility only copy DVDs, while AnyMP4 Video Converter Ultimate converts DVDs to digital formats, their comparison in terms of output quality, file size, etc., is only based on the reference of different output formats.
Can I rip a copyrighted DVD to an MP4 video on my Mac?
No. Both the built-in Disk Utility and the recommended Video Converter Ultimate can’t help you rip a protected DVD. Even many homemade DVD ripper tools offered on the market claim that they can help you rip commercial DVDs, you shouldn’t use them, for copy protection.
Is it legal to copy homemade DVD to Mac hard drive?
For personal usage, you are allowed to copy home-made DVDs to digital files on your Mac.
Can I use VLC to convert homemade DVD on my Mac?
Yes, VLC can help you play and rip homemade DVD on a Mac. It enables you to make a copy of your home-made DVD. You can open VLC Media Player on your Mac, go to the Media and then choose the Open Disc option. Play your DVD in VLC, click on the top Media menu, and then use its Convert/Save feature to copy your homemade DVD on the Mac.
This post shares 2 effective methods to import and copy homemade DVD to Mac hard drive. You can use either one to help you save files from your DVD disc to Mac.