The iTunes is a utility for iPhone and iPad owners to back up and transfer data between iOS device and computer. In fact, Apple has introduced a wide range of features into iTunes. Some features are even not widely mastered by users, such as editing songs in iTunes library.
To be honest, iTunes is not a professional audio editor, but it has the capacity to cut and remove unwanted part from a song simply. This tutorial will show you how to edit a song in iTunes.

In addition to rename a song, iTunes only allows you to cut music in your library.
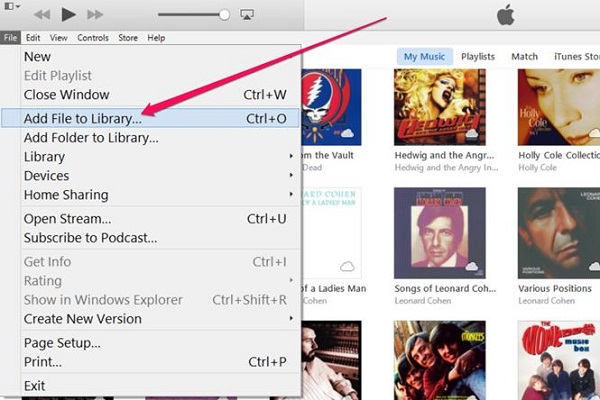
Step 1: Import the song to edit into iTunes library. Open your iTunes and update to the latest version. Click File > Add File to Library to add the song into library.

Step 2: Click the Music icon at upper left side to open the Music Library, select the song and click Open to play the song. Write down the start and the end time of the part that you want to retain. The exact time is displayed on the status pane at the top center of the window.
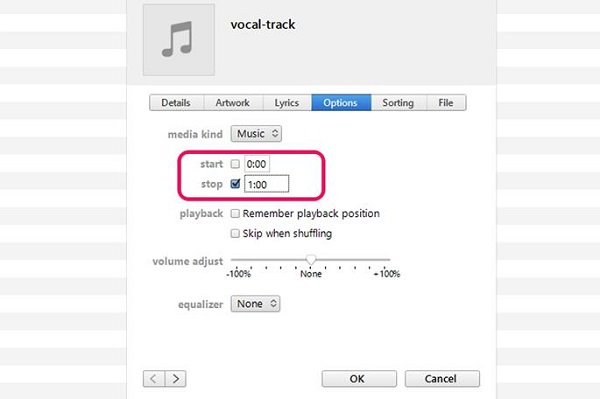
Step 3: Right-click on the song you wish to edit in iTunes and select Get Info from the menu list. The information dialog will pop up with several tabs. Go to the Options tab and you will get some custom options.
Step 4: Tick the checkboxes next to start and stop labels. Next, input the start and the end time into the corresponding boxes. For example, if you expect the song to start from 5 seconds and end at 3 minutes, you should type in 0:05 into the start box and 3:00 into the stop box.

Step 5: Then customize volume adjust and other options based on your needs. Click on the OK button to confirm the changes. iTunes will create a new song according to your settings.
Step 6: Finally, right-click on the new song and then hit Create New Version > Create AAC Version. It will save the new song to your iTunes library. To look at it in folder, you need to right-click on the song and choose Show in Windows Explorer.
Note: If you do not create a new version for the edited song, you cannot find it in iTunes Library or any folder.
Unfortunately, iTunes cannot edit a song besides cutting. If you wish to use the song for your video or slideshow, AnyMP4 Video Editor is the best method since it offers a variety of useful features, such as:
Step 1: Install AnyMP4 Video Editor on your computer
Download the best video and audio editing software and install it on your computer. Launch it and click the Add photo and video here button to import the video file. It will be placed to the storyboard automatically after importing.
Secure Download

Step 2: Add the song to a video after editing in iTunes.
Locate the bottom area and press the Plus icon in front of the Add Background Music label. Then navigate to the song in the open file dialog and hit Open to add it. By default, the song will be cut according to your video. Tick the box of Keep original audio track, if you do not want to change the song.

Step 3: Export the video file
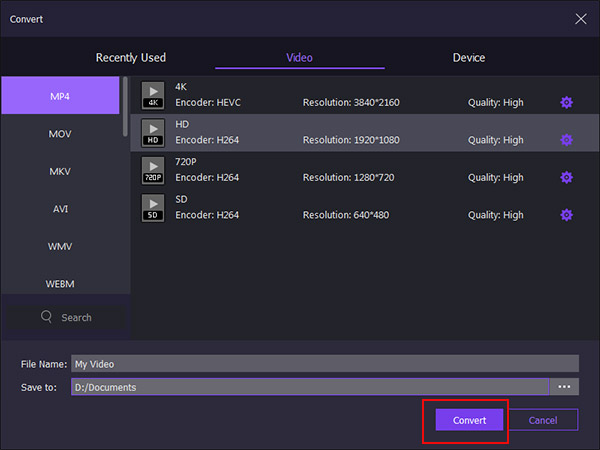
Play the result in the built-in media player to check the result. If you are satisfied with the result, click the Export button. Then select an appropriate format from the left hand column, such as MP4, and choose your favorite quality. Drop the file name in the File Name field and select a location to save the result by hitting the three-dot icon. Click the Convert button to export the result to your computer.

This tutorial showed you how to edit a song in iTunes. As you can see, the iTunes is a simple way to cut a song and remove unwanted parts. If you already have iTunes on your computer, just use it following our guide. However, iTunes does not provide other audio editing features, such as attaching the song to a video. From this point, we recommended a professional video and audio editing program, AnyMP4 Video Editor. It is not only easy to use, but also able to add your favorite song to a video simply.