Transferring different media files between iOS devices is now easy to make. That is because iOS features that will allow us to share files immediately. The AirDrop feature of iOS is an innovative part that is faster than transferring files using Bluetooth. As we put it in the context, AirDrop will allow you to send and receive any media file without complications. If you plan to move a bulk of photos from iPhone to iPhone, the process may take only a second to make. In that case, it is a big problem if your AirDrop is not working. It would be a hassle if we experienced that problem. However, you are on the right path if you are experiencing the issue. Does this post exist to help us answer why AirDrop does not work? We will also give you a few practical solutions to fix the hassle-free problem. We shall now continue the transfer after knowing the proper ways to alleviate your pain.

There can be a lot of reasons why your AirDrop does not work. It may vary depending on the situation you are in. However, we understand that experiencing this problem will bring tremendous hassles with our transferring process. In line with that, we have a few common reasons why our iPhone or Mac AirDrop is not working. As we give you the rundown, the problem may be caused by:
Those are a few reasons why you cannot use the Airdrop feature productively and adequately. You might encounter more reasons, as we all know the problem may occur depending on the situation and the type of iOS and macOS you have. As we proceed with the next part of this article, we will show you the solution to fixing it. Kindly move in reading to discover more of it.
This solution will require you to check your iOS and macOS devices to see if they support AirDrop features. As we give you the details about it, iPhone and iPad users can use the feature if their device is an iPhone 5, 6,7, 7+, 8, 10, 11, and more, iPad 4 or later, iPad mini, and other fifth-generation iPod touch.
As we are proceeding with macOS devices, it is essential to know that all Mac models released starting in 2012 and later running OS X Yosemite or later are compatible with Airdrop. As we guide you to check it, kindly see the instructions below.
Step 1: Go to the Finder on your Mac Computer.
Step 2: On the option, locate and select the Go option.
Step 3: Direct yourself to locate the Airdrop from the drop-list shown on the screen.

That is the reason to check if your device supports the AirDrop feature. We can now say that when AirDrop is not Working on Mac, there is a high possibility that your device does not support the AirDrop feature.
The following solution we can do is to configure our AirDrop setting properly. As we all know, improper settings can prevent us from being successful. If that is the case, let us fix it by following the instructions below. We need to do three things with different devices - iPhone, iPad, and macOS.
Adjusting AirDrop Setting (iPhone and iPad):
Step 1: Direct yourself to the Setting of your iPhone or iPad. From there, go to the General.
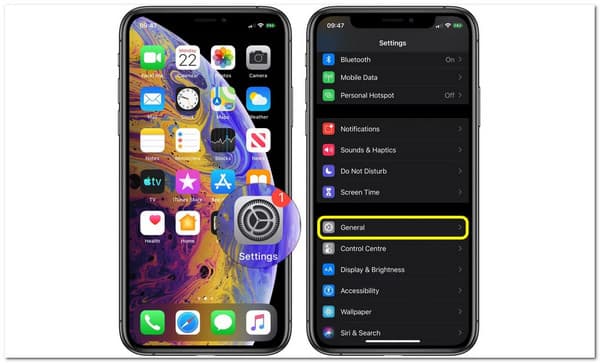
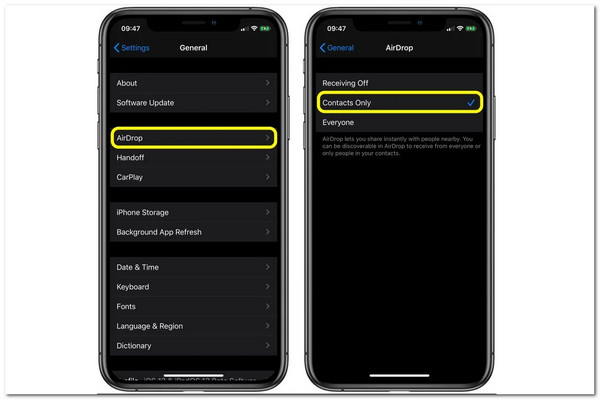
Step 2: From the option of General settings, tap the AirDrop button.
Step 3: A new set of settings will exist. From there, choose Everyone within options.
Adjusting AirDrop Setting (Mac):
Step 1: On your macOS, direct your device to the Finder and select the option for AirDrop.
Step 2: On the left corner of your screen, choose AirDrop.
Step 3: From the left corner, please find the Allow me to be discovered by. Three options will exist. Kindly set it to Everyone.

Toggling WiFi and Bluetooth for iPhone and iPad:
Step 1: From your iOS device, open the Settings.
Step 2: Go to the WiFi.
Step 3: Switch your WiFi to toggle it off, and click it again to toggle it on
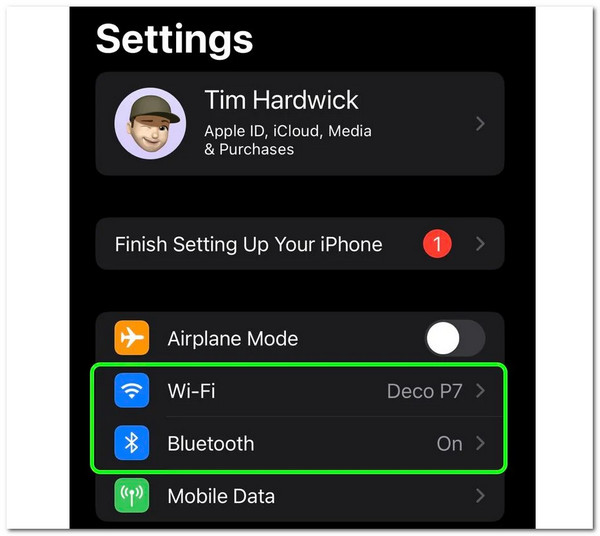
You can also follow these instructions by toggling your iOS Bluetooth. The thing we only need to do is go to Bluetooth instead of WiFi.
WiFi is necessary to use AirDrop. If your iPhone cannot connect to WiFi, just find the WiFi password for the iPhone here.
Toggling WiFi and Bluetooth for Mac:
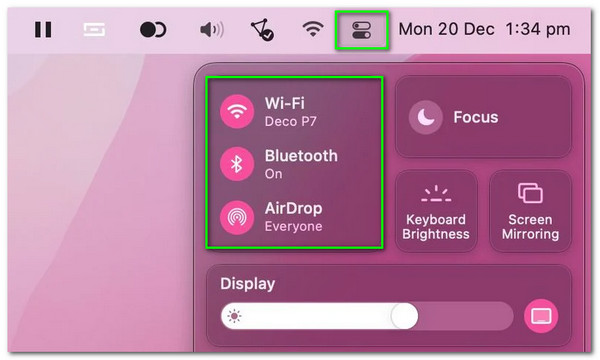
Step 1: To begin, please go to the Control Center icon on your macOS computer. You can probably see it via the right corner of your menu bar.
Step 2: From the icon bar, locate the Bluetooth and WiFi panes. Switch next to them to toggle them.
Our Hotspot is another element that will hinder us from using the AirDrop of our iOS or macOS. Enabling your Hotspot can give you problems. If that is the case, we shall now disable it to use the features hassle-free.
Step 1: From the home screen of your iOS, swipe up from the bottom screen and see the Control Center.
Step 2: Notice the first category of setting from the Control Center, tap and hold it for a few seconds to show all of the features under it.
Step 3: At this moment, you can now see the enabled Personal Hotspot. Tap it once, and the green color will disappear. That means you are now disabling your Hotspot.

That is the simple way to disable our Hotspots without complication. After doing it, please try again and see if the AirDrop process is now delicate.
If you have tried every solution above but the problem still exists, it is now the time to use an alternative to our AirDrop. Fortunately, this portion will show you one of the great tools to quickly transfer your files. AnyMP4 iPhone Transfer Pro is a transferring tool that offers a straightforward and effective process of sharing your media files. It covers many features other than the transferring features, and you may also use this for editing files and creating ringtones. However, we shall now see its ability to transfer aspects.
Secure Download
Secure Download
Step 1: Get the AnyMP4 iPhone Transfer Pro for free and install it with your computer. Open it with ease to see its whole interface.
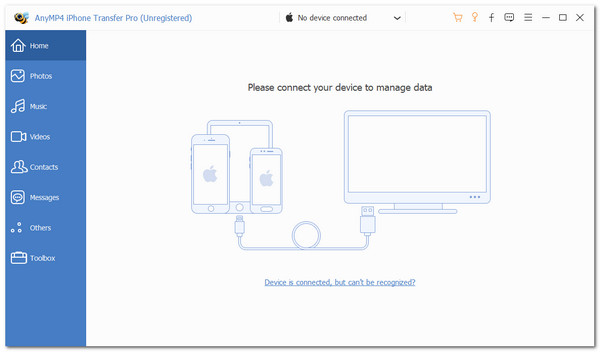
Step 2: Connect your iPhone with your computer using the cable.

Step 3: Please click the files you want to traders on the left side and select each file. Then choose the Export to PC to move data to computer or Export to Device icon to sync iPhone data to another iPhone on the top portion of the interface. Then wait for the software to load until it successfully transfers your files.
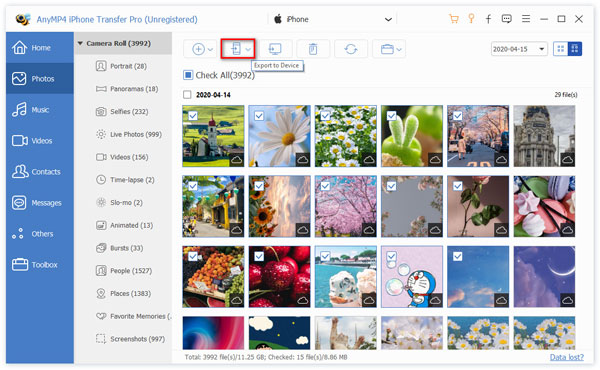
We can follow three simple steps to transfer media files if your Airdrop is not working correctly. We can see how easy it is to use the software and also how effective one.
Question 1. Does the iPad possess the AirDrop feature?
Yes. iPad also possesses an iOS operating system that contains AirDrop features. That means you can also transfer files quickly with your iPad to any Apple product that supports AirDrop, like iPhone and Mac.
Question 2. What is why my AirDrop is not showing on my iOS device?
The problem of not showing up your AirDrop on your iOS devices is because of the problem with your devices. AirDrop receives requests. As we fix it, please go to the Go, locate AirDrop from the menu, click the Allow me to be discovered by option, and then choose Everyone.
Question 3. What is the easy way to turn off AirDrop with an iPhone?
Open the Control Center of your iPhone by scrolling up from the bottom. You will see a set of features. Tap and hold the first box for a few seconds from the first option and tap the AirDrop to turn it off.
Through this article, we can find a lot of methods that we can use in fixing our AirDrop that are not working. We hope that the solutions above help you alleviate a problem and let you continue the transferring process successfully. However, if you tried all of the answers above but the problem still exists, we suggest connecting to Apple Support for immediate solutions. Please share these posts with those users who need them, or you may also visit our website for more information that can help you manage your media files and tips to solve your problems with your devices.