When it comes to producing content, audio quality is as important as video quality. Because of that, noise suppression systems are a huge commodity since a capable noise filter tool could enhance the quality of an entry-level microphone. In terms of screen and webcam recording tools, Open Broadcaster Software (OBS) is perhaps the most used program today. With that in mind, this article will be focused on how to set up OBS noise suppression system to help our readers learn how to use the tool for an increased quality of their voice recordings. We will provide a tutorial on how to set up both Noise Gate and Noise Suppression filters in the software, along with an alternative recorder that is designed to be more accessible for newer users.

The best Noise Gate settings heavily depend on your environment since this option needs to be adjusted based on the background noise your mic could capture in your area. To learn how to discover your optimal noise gate settings, please read our guide below.
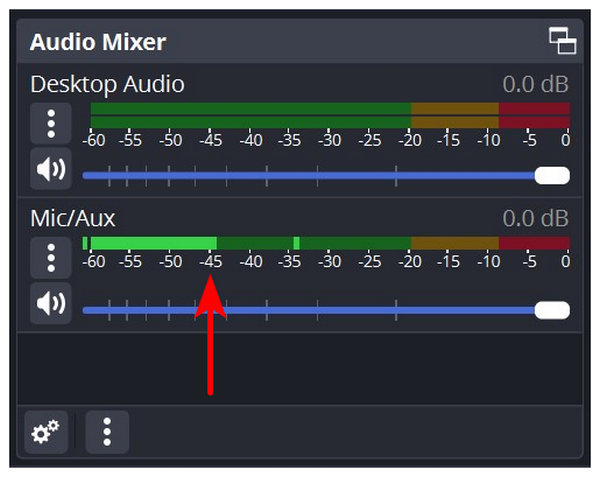
1. Stop talking and observe your mic audio capture display. Note the average value that your device can capture even if you are not talking.
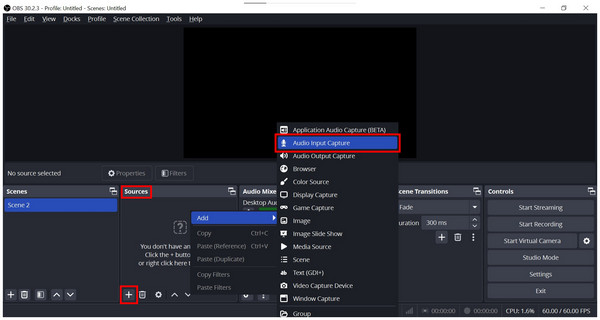
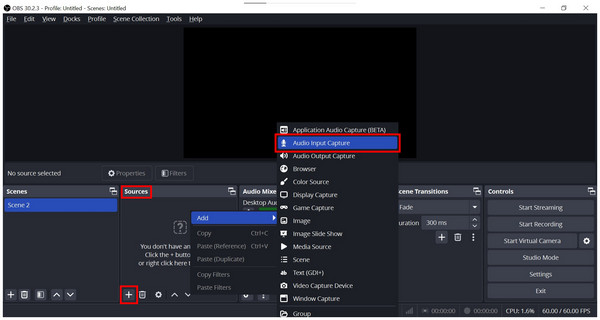
2. Find the Sources tab and click the Plus button or press Right-click in the tab itself. Then, select Audio Input Capture.
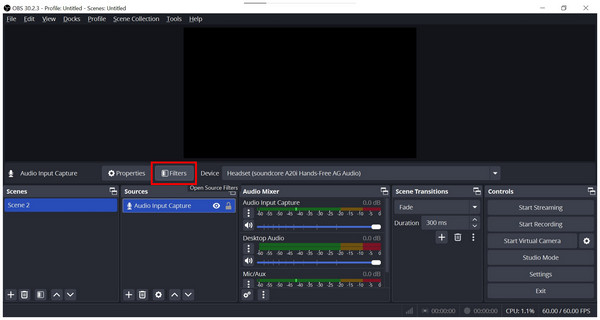
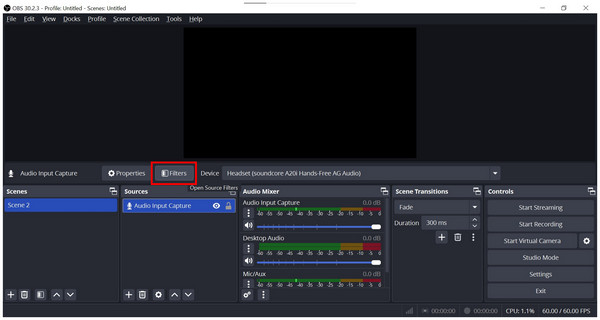
3. Click on the added Audio Input Capture in the Sources tab and select Filters.
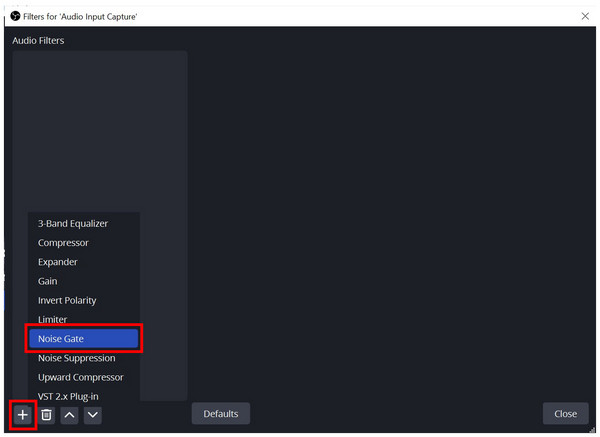
4. Select the Plus button in the Filters menu and select Noise Gate.
5. Adjust the Noise Gate’s Close and Open Thresholds based on the background noise value captured in the first step. The Close Threshold should be slightly above the background noise value, while the Open Threshold should be slightly below it.
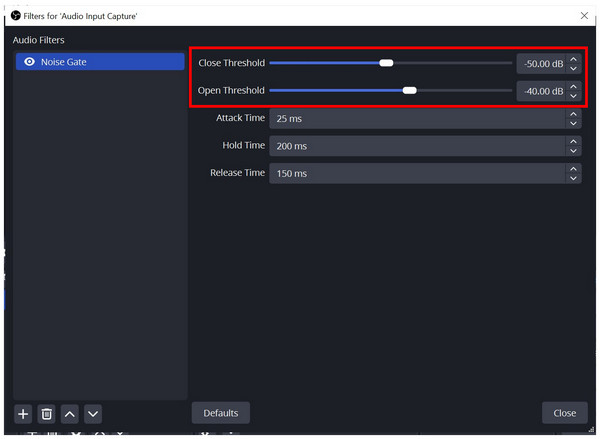
Follow this general guideline whenever you record in a new environment or when your mic keeps capturing unwanted background noise. This is a solid solution if you want to learn how to get rid of background noise in OBS. Otherwise, you can also try other OBS alternatives similar to the featured software in the fourth section of this article.
With Noise Gate now discussed, we can proceed to the other filter option, Noise Suppression mode. Continue reading below to learn how to turn on noise suppression in OBS.
1. Go to the Sources tab and click the Plus button or press Right-click in the tab itself. Then, select Audio Input Capture.
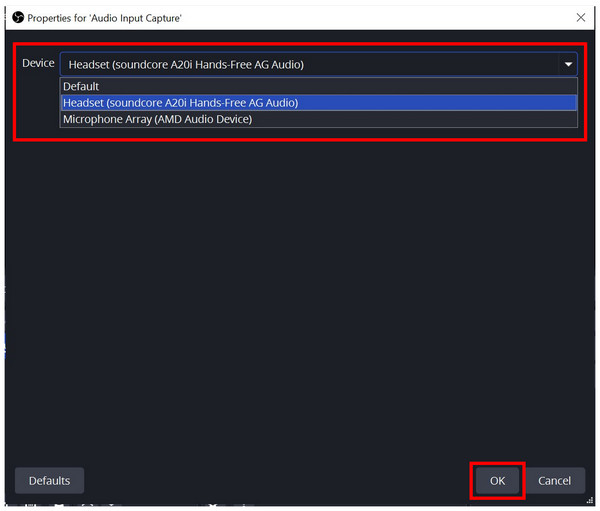
2. In the properties window that will pop up, select the Device that you want to use for audio capturing. Click OK to confirm your selection.
3. Click on the added Audio Input Capture in the Sources tab and select Filters.
4. In the Filters menu, click on the Plus button and select Noise Suppression.
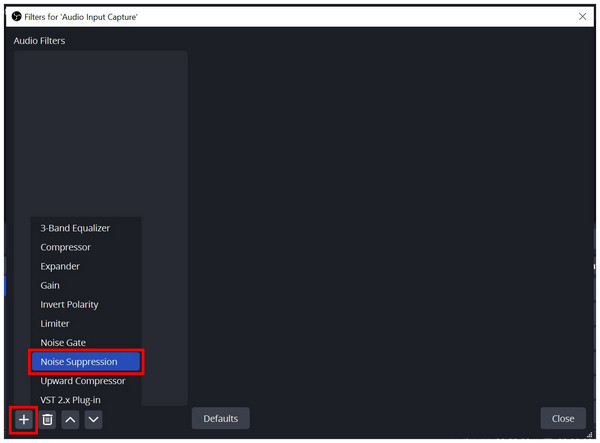
5. With the Noise Suppression filter now added, select the noise filter method. You can choose between RNNoise or Speex.
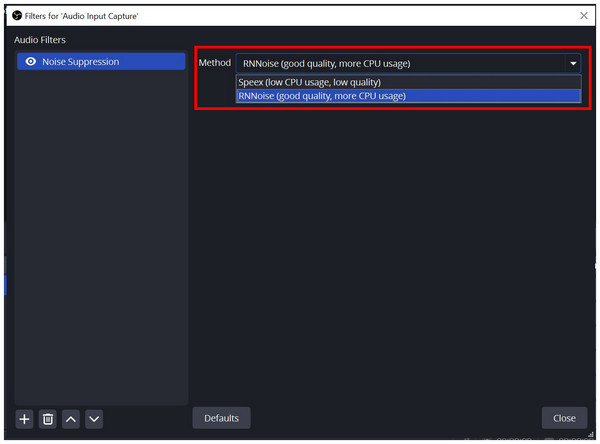
To learn the differences between these two modes, please read the next section of the article.
Since OBS is already equipped with capable noise suppression systems, there are additional plugins built into the software if you are looking for an upgrade in the noise filter option. Although both of these additions are good in their rights, one is designed to handle major noises while the other is optimized for customizability. Please continue reading below to learn what these plugins are.
RNNoise is an AI-powered noise suppression plug-in built into OBS. This high-quality noise suppression system filters out major noises, such as computer fans, cars and transportation, crowd murmurs, construction equipment, and other loud environmental audio. Due to its highly capable noise filtering ability, this plugin requires significant CPU resources, making it only a good option if you have powerful hardware.
When looking for a good noise filter system, Speex should be the best option for users running OBS in entry-level to midrange computers. Although this option is slightly weaker in noise suppression, it more than compensates for its customizability and low CPU usage. Because of these major features, Speex is the more advisable system if you are experienced in adjusting audio-related settings without sacrificing too much CPU resources.
If you are unsure which of these noise suppression options you should use in OBS, we recommend using an alternative voice recorder that can be set up within a few clicks and requires no technical knowledge to use effectively. If you are interested in learning what this program is, continue reading below.
Although OBS software is highly regarded as a high-quality recording tool, its biggest downside is that it requires significant technical knowledge to run properly. Simply put, the software is not accessible to beginners and new users who are not used to professional-level programs. Because of that, finding an alternative that can deliver the quality to match OBS but is easier to use could be the most straightforward solution. With that in mind, this section of the article will feature the best software in terms of performance and quality with none other than AnyMP4 Screen Recorder.
Despite its title as a screen recorder program, this software was developed to be an all-around recorder for computers. In fact, the program has seven recording modes, one of which is a dedicated and fully functional Audio Recorder feature. This audio recorder mode is fully capable of recording system sound, microphone, or both simultaneously, making the tool an ideal recording option. In addition to this, this mode also has a built-in audio enhancement feature which is automatically activated when the software is used.
If you want to improve the quality of your audio recordings when using AnyMP4 Screen Recorder beyond the audio enhancement feature, you are in luck since the provided guide below will provide an in-depth tutorial on improving the input quality of audio recordings using the tool’s advanced settings.
Make sure to download the software first to follow each step easily.
Secure Download
Secure Download
1. Open AnyMP4 Screen Recorder and switch to the Audio Recorder mode.
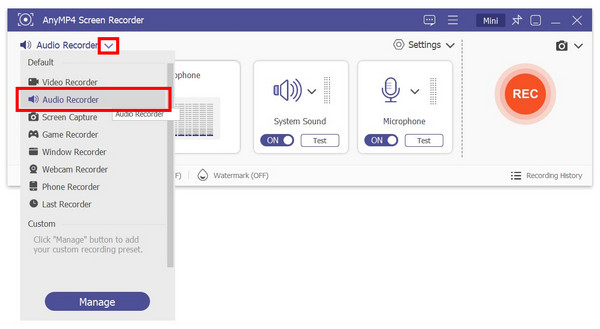
2. In the Audio Recorder mode, click on Settings and select Record Setting.

3. In the Preference Settings that pop up, click on Sound and select the Sound Settings.
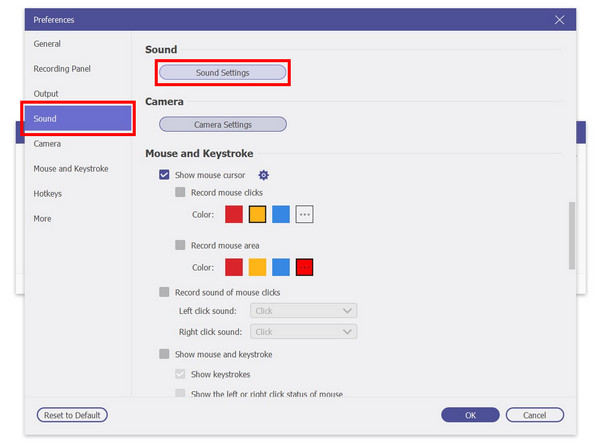
4. With the Sound Settings now opened, click on both of the Checkboxes under Microphone labeled as Microphone Noise Cancellation and Microphone Enhancement. Click on OK to confirm your settings.
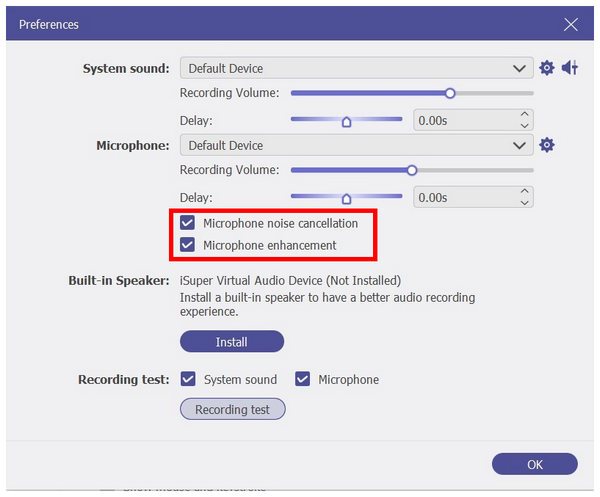
5. With the Sound Settings now opened, click on both of the Checkboxes under Microphone labeled as Microphone Noise Cancellation and Microphone Enhancement. Click on OK to confirm your settings.

Although much easier to set up and more beginner-friendly than OBS, AnyMP4 Screen Recorder does not sacrifice the quality of your screen and audio recordings. This makes the tool a solid option if you want a program that can be trusted without being too complicated.
With the different methods to apply noise suppression in OBS now discussed, we hope that this article has proved useful for your needs as a content creator or as a general user of recording programs. When looking for software that is much more accessible, make sure to try using AnyMP4 Screen Recorder.
Please share this article online to help other OBS users who are having trouble improving their audio recording quality or to users who are unsure where OBS recordings go.