iMovie is believed to an easy way to edit videos and audio tracks on Mac computers. More importantly, it is free bundled with all purchased Macs. However, iMovie is not a perfect utility at least for those who ever tried to burn iMovie projects to DVDs.
If you are using iMovie 09 or earlier, you can share the iMovie project to iDVD and then use the latter to create a DVD. However, Apple has discontinued iDVD since Lion. Therefore, iMovie 10 and later no longer supports iDVD.
Don't worry! You still can burn iMovie to DVD without iDVD. This tutorial will show you how-to in detail.

To test the DVD-burning ability of two methods, we prepare one iMovie video of 30 minutes and use these two tools to burn it to DVD. Here are the results of burning a DVD.
| Speed | Edit Settings | Other Settings(menu, music, etc.) | Compatibility | EOutput | Encoding | |
|---|---|---|---|---|---|---|
| AnyMP4 DVD Creator | 45 minutes | Yes | Yes | Mac OS X 10.9 or later. | DVD+R/RW, DVD-R/RW, DVD-RAM, DVD-5, DVD-9. | NTSC, and PAL. |
| iDVD | 95 minutes | No | Yes | Mac OS X 10.6.7 or later. | DVD-R, DVD-RW, DVD+R, DVD+RW. | NTSC, and PAL. |
Before formally starting the DVD-burning process, you need to first export iMovie as the common video files. The operations are easy and follow us to see.
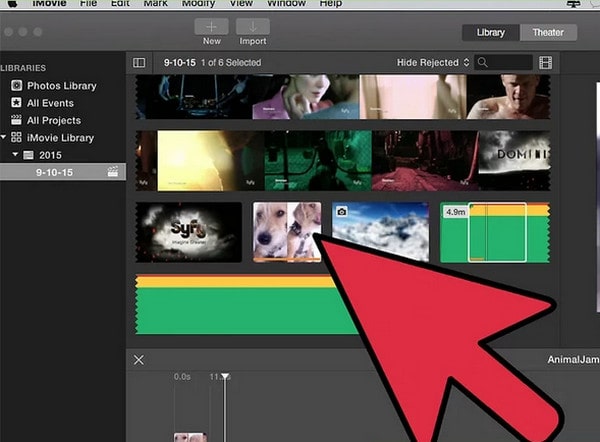
1. Open iMovie on your Mac computer. Choose one iMovie file you want to save in MP4 format for the subsequent burning.
Note: We chose MP4 as the example because it is compatible with most devices and platforms.
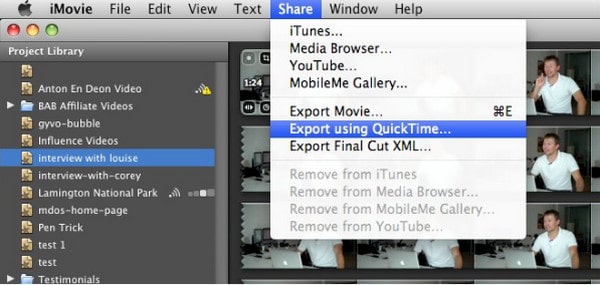
2. Then, choose Share in the top menu bar and select Export using QuickTime in drop-down options.
Note: QuickTime comes pre-installed on MacBook, which helps you easily save iMovie as MP4 videos.
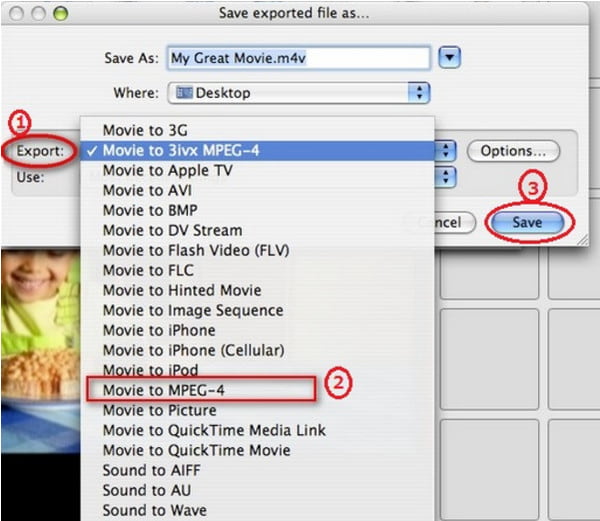
3. A window pops up and you can edit the export information. Click the Export button to choose the Movie to MPEG-4 option. Then, click Save to export iMovie to MP4 video files.
Note: You can also change the title and destination folder of the output MP4 video so that you can easily identify the video.
OK, after successfully exporting iMovie as an MP4 video, follow to see how to get an iMovie onto a DVD.
How do you burn an iMovie to DVD? We want to recommend the powerful DVD-burning software, AnyMP4 DVD Creator. AnyMP4 DVD Creator enables you to create DVDs from different video formats, including iMovie videos. You can choose the Disc Type, Aspect Ratio, and Video Quality based on your requirements. Besides the basic settings of burning DVDs, it also provides extra editing tools for you to adjust audio tracks, subtitles, chapters, etc. With the hardware acceleration technology, you can enjoy a super-fast burning speed.
Features
Apparently, it is the best way to burn iMovie to DVD without iDVD. Now, here is a detailed guide on how to create a DVD from the iMovie project.
1. Import iMovie videos to the best iMovie to DVD burner
First of all, convert the iMovie project you want to burn to DVD to a video file. Download and install AnyMP4 DVD Creator to your PC. There is a dedicated version for Mac computers. Launch the program and click the Add Media File button to import the iMovie video file.
Note: You can batch input iMovie files as you need, which can export many iMovie to one DVD.
Secure Download
Secure Download
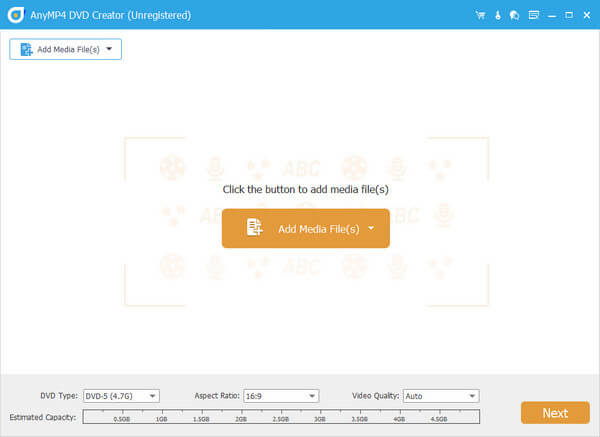
It supports burning almost all video and audio formats to DVDs, like MP4, MOV, AVI, FLV, etc.
2. Preview iMovie video files
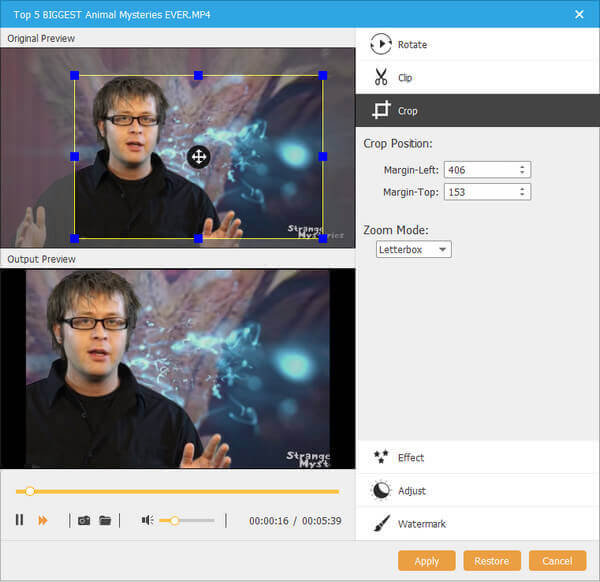
Select the video file in the media library and view it in the media player on the right side. If you want to edit the video further, click the Edit icon on the video file to open the Editor window. Here offer several editing tools, like Rotate, Crop, Clip, Effect, Adjust and Watermark.
Note: You can preview your video projects in the editing interface without extra software.
3. Write iMovie to DVD
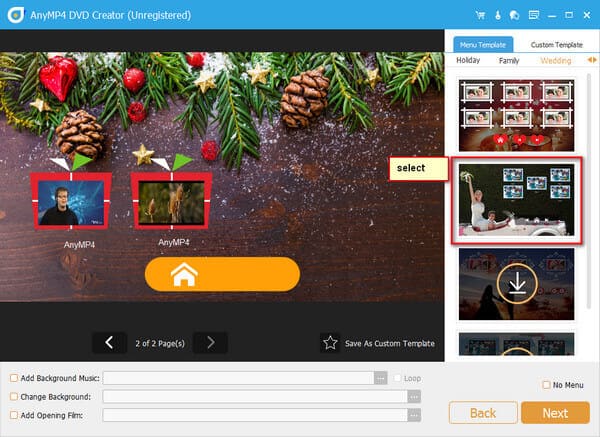
Back to the home interface and click the Next button to go to the DVD menu template window. Select your favorite template from the database, and replace background and other elements as you wish. Finally, click the Next button to start putting iMovie to DVD.
Note: It provides extensive DVD menu templates in high quality and updates frequently.
4. In the last step, edit the provided settings, like destination folder, playback mode, TV standard, etc. Then, click Start to begin creating a DVD.
Note: You are suggested to check Save as ISO to back up the DVD content.

We believe you have learned how to burn iMovie to DVD to play on TV. The steps are easy and intuitive. This powerful tool provides rich functions and offers a free trial version. Why not download the software and have a try?
Someone would ask how do I convert iMovie to DVD without downloading software. The answer is yes. iDVD is the native iMovie to DVD creator for a part of Mac computers. If you have iDVD on your computer, you can use it to make a DVD from iMovie.
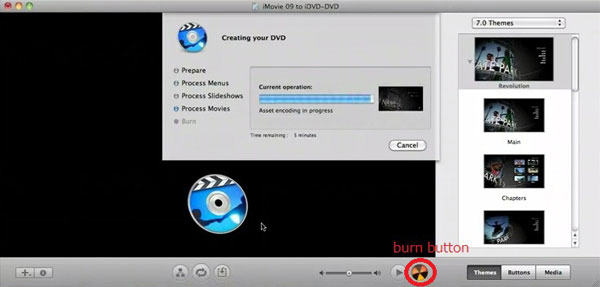
How to create a DVD using iMovie? Let's see the specific steps.
1. Open the project you want to burn on DVD in your iMovie. Select iDVD and click Share button to begin exporting iMovie to iDVD. It takes a few minutes to an hour depending on the size of your iMovie project.
Note: iDVD is free and native on Mac OS X versions 10.6 and up. It can import iMovie projects natively and functions well with iMovie 09 or older.
2. Next, iDVD should open automatically with the video file. Choose a theme based on the style of iMovie project and then insert the video frames onto the proper pages of the theme.
Note: You can click the Theme button at the right corner to edit the DVD menu.
3. When it finishes, click Preview to look at your video before writing it to DVD. Also, you can adjust the burning preference. Go to Project Menu -> Project Info and change the quality and other parameters.
Note: To buffer and burn a DVD, iDVD requires a large free hard drive space. To make hard drive space available on your Mac, remove all unnecessary data and files.
4. Go to Project Info -> Burn to initiate exporting iMovie to DVD..
Note: iDVD is a convenient way to burn iMovie projects to DVD. It has the capacity to detect errors in your projects and pop up the notification. You can decide to ignore them and continue the process. However, iDVD is not available to all Mac computers, especially the latest machines. Moreover, only the old versions of iMovie could work with iDVD.
This tutorial has told you how to burn iMovie to DVD. Generally speaking, there are two approaches to achieve the task, with iDVD or a third-party application. iDVD is the native DVD creator for Mac OS X10.6 earlier; however, Apple has discontinued it. If you have not updated your MacOS, you can follow our guide to burn iMovie to DVD with iDVD. On the other hand, iDVD is not the only option. AnyMP4 Video Creator, for example, is one of the best ways to convert iMovie to DVD. We hope our recommendation and guide are useful to you.
Secure Download
Secure Download