If you have a problem with your USB flash drive, you might need to back up photos from the flash drive to computer. But when you insert the USB flash drive on PC, Windows says that the drive is corrupted. How to repair USB flash drive and get back photos? It is true that flash drive is a convenient way to transfer data between computers and other devices. However, it is not a good storage device and users take the risk of data loss all the time. Fortunately, there are approaches to repair USB flash drive and recover data from it. All you need to do is to follow the tutorial below.
In this part, you can learn multiple approaches to make USB flash drive repair quickly.
When your USB flash drive works abnormally, the first thing you should do is to try another USB port. A PC or laptop usually has more than one USB port. And you'd better clean up your USB ports, because dust could affect the communication between flash drive and computer.
If the USB port is ok, you can try to connect your flash drive to another computer. Sometimes, the flash drive just does not work fine on the computer.
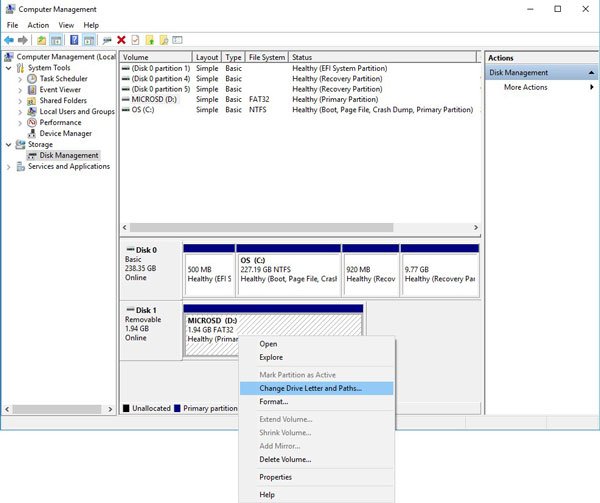
Operating system read a flash drive through drive letter, similar to local disk. If the drive letter of your flash drive conflicts with an existing disk, Windows may refuse to read your flash drive or pop up error message. The solution is simple: change the drive letter of your USB.
Step 1: Turn on your computer and plug the USB into the PC. Expand the "Start" menu and choose "Computer Management" to open it.
Step 2: Go to "Storage" > "Disk Management" from left navigation bar, you can see the flash drive on right pane. Right click on it and choose "Change Drive Letter or Paths".
Step 3: Click "Change" and then select an available drive letter from the dropdown menu. Click on "OK" to reassign a drive letter and complete flash drive repair.
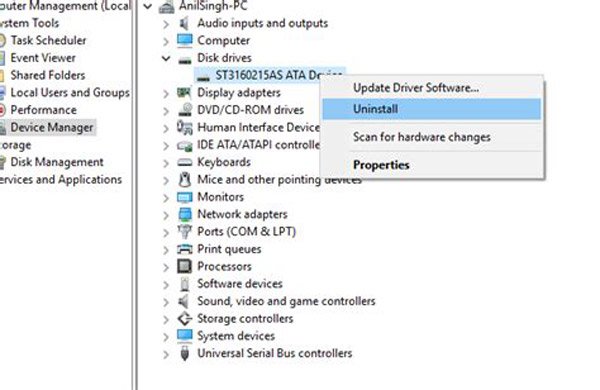
Outdated driver could produce many problems, including USB flash drive corrupts. So, it is a good idea to do USB repair through update drivers.
Step 1: Make sure to connect your flash drive to your PC. Go to the "Start" menu and choose "Device Manager".
Step 2: Find and expand the "Disk drives" entity, then right-click on the sub-entity that has the same name with your USB.
Step 3: Choose "Update Driver Software" on the floating menu bar. Windows will search for and update drivers automatically.
Congratulation! USB repair is done.
Error checking is the built-in USB repair tool on Windows. It is not able to check local hard drive, but also available to removal drives, like USB flash.
Step 1: Click "My Computer" or This PC on your desktop and you can find your USB flash drive under "Portable Devices" section.
Step 2: Right-click on your USB and select "Properties". Go to the "Tools" tab on the popup window and click the "Check" button in Error checking area.
Step 3: Then click "Scan drive" and wait for the process to complete. If there is something wrong, choose "Scan and repair drive" on the popup dialog to repair thumb drive.

Unfortunately, you cannot recover data without a professional tool, if a flash drive corrupt or unresponsive. That is why we recommend AnyMP4 Data Recovery. Its key features include:
1. Easy to use, recover data from flash drive in a single click.
2. Data recovery even though the flash drive is corrupted and not working.
3. Support a variety of data types and formats, including all image, video, audio, document, email, archive formats and more.
4. Lossless recovery and restore files from flash drive in original conditions, format and quality.
5. Preview all readable data and decide to recover all of them or certain files.
6. Quicker and safer, as a lightweight USB repair tool, it can restore lost data quickly and safely.
7. Moreover, Data Recovery is available to Windows 10/8.1/8/Vista/XP and various file systems, like NTFS, FAT16, FAT32, exFAT, EXT, etc.
In short, the best USB repair tool almost equips all features you are looking for about restoring flash drive.
Secure Download
Step 1: Scan entire USB to look for data
Download and install the best USB repair tool on your computer and make sure to hook up the USB to your PC. Open Data Recovery, you can see two parts, Data Type and Location. First of all, choose the data types to recover in Data Type area. Then select your USB under Removal Drives. Click on the "Scan" button to start looking for readable data on your flash drive.

Step 2: Preview before flash drive recovery
After scanning, you will be presented the result window with all readable data ordered by types and formats. For example, go to the "Image" tab from left side, and then you can preview thumbnails in the folders on right panel. If you want to find a certain file quickly, enter the key word in the box on top ribbon and hit the "Filter" button. Plus, the "Deep Scan" function is able to recover more data.

Step 3: Recover data from corrupted flash drive in one click
Select all data that you want to recover from the corrupted USB and hit "Recover" button. On the popup dialog, drop another destination and initiate USB flash drive repair. Then you can view, move or edit your USB data on computer.

In this tutorial, we have talked about how to repair USB flash drive without data loss. According to our research, flash drive is one of the popular ways to transfer data. But some people reported that their data lost since flash drives corrupted. With our guides, you can feel free to use your USB and not need to worry about data loss when flash drive not working.