How to Go Live on Instagram App & Computer [Tips & Tricks]
Instagram Live is a powerful tool that lets you connect with your followers on a deeper level. It goes beyond static posts and stories. Going live allows you to engage with your audience directly and build a stronger community. In this post, we will equip you with everything you need to know how to go live on Instagram. We’ll explore the requirements you need to meet before broadcasting. Also, we will walk you through the complete steps of launching a live stream directly from the Instagram app. Additionally, we’ll explore alternative methods for those who prefer a pre-recorded approach.

Part 1. What is Instagram Live
Before we go into the specifics, let us first understand: What is Instagram Live? It is a feature that lets you broadcast live video directly to your followers. Unlike pre-recorded videos on your feed or Stories, it is all about real-time interaction. You can access it through the Camera icon of the Instagram app and choose Live. Once live, your broadcast appears at the top of your followers’ Stories feed, notifying them you’re streaming.
The advantage of Instagram Live is its interactive nature. Viewers can comment and ask questions, which you can address directly. This fosters a more personal connection with your followers. You can host Q&A sessions, behind-the-scenes glimpses, live tutorials, or even casual chats. This allows you to build a relationship with your followers. You can also go live with another guest for a more engaging discussion. Check this out to go viral on Instagram.
Part 2. What are the Requirements to go Live on Instagram
Going live on Instagram is a fantastic way to connect with your audience in real time. But before you hit that Live button, there are a few requirements to fulfill to ensure a smooth live streaming. Here’s a breakdown of the essential requirements:
Account Age
Essentially, your Instagram account needs to be at least 30 days old. Instagram implements this to help prevent misuse of the live feature by brand new accounts. It ensures you’re a legit user before granting access to the live feature. If your account is younger than 30 days, you won’t see the Live option. You will have to wait before you can start broadcasting.
Account Type
Fortunately, you don’t need a business or creator account to go live on Instagram. Regular personal accounts can use the Live feature as well. Having a business or creator account can unlock some additional features, though, such as analytics for your live streams. This flexibility lets you use live streams for various purposes regardless of your account type.
App Permissions
Basically, you need to grant Instagram access to your device’s camera and microphone. This allows the app to capture your video and audio during the live stream. This makes perfect sense, as a live stream is all about real-time audio and video. Granting these permissions ensures viewers can see and hear you during your broadcast.
Part 3. How to Go Live on Instagram
Instagram Live is a feature that lets you uniquely connect with your followers. It allows you to ditch pre-recorded content and broadcast live video, fostering a sense of real-time interaction and engagement. So, whether you’re a seasoned influencer or just starting to build your audience, it offers an exciting way to connect and grow your community.
Here’s how to go live on Instagram app:
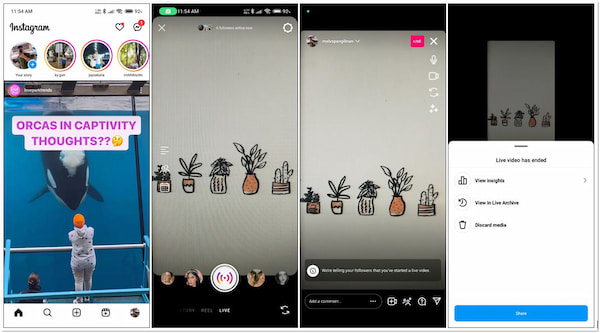
1. Open the Instagram app and navigate to the camera screen. Swipe right from the home screen or tap + to access the camera screen.
2. At the bottom of the screen, you’ll see various options for photo and video capture. Look for the Live option, located next to the Reel option.
3. Before hitting the Live button, customize your stream. Add a title to give your livestream a catchy name, and choose your audience. Your Livestream will be public by default.
4. Once you’re ready to begin broadcasting, tap Live at the bottom of the screen. Instagram will initiate a 3-second countdown before your live stream starts.
Note: After ending your live stream, Instagram gives you the option to save the replay. This enables viewers who missed the live broadcast to catch up later.
If you want to use Instagram on PC to go live, check this post here.
Part 4. How to Go Live With a Pre-Recorded Video on a Computer

Instagram Live is a fantastic tool for real-time interaction, but it does have its limitations. One particular limitation of Instagram Live is it can only last for 4 hours. If you’re creating a tutorial with intricate techniques, 4 hours might not be enough.
Trying to squeeze a tutorial into that timeframe might feel rushed, leaving viewers missing key details. But here’s a thing. By pre-recording, you can take all the time you need to film a clear and thorough tutorial. You can complete it with close-up shots, voiceovers, and editing transitions. This allows you to deliver high-quality content without feeling constrained by the live format.
Record and Edit a Pre-Recorded Video on a Computer
AnyMP4 Screen Recorder allows you to pre-record and edit polished tutorials that will leave your viewers impressed. It lets you effortlessly capture your entire screen, a specific window, or a custom region. This is ideal for tutorials, as you can demonstrate software functionalities or intricate design processes.
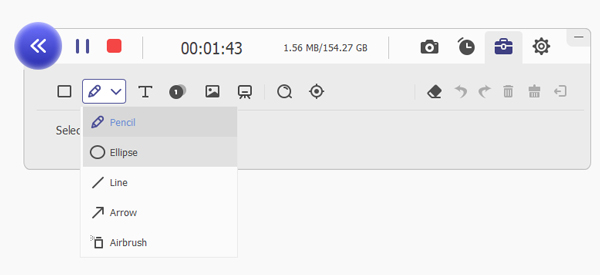
Not to mention, it features various unique recording modes. This includes the Video, Audio, Game, Webcam, Window, and Phone Recorder. While recording, you can incorporate your microphone and system sound and even overlay your webcam simultaneously. Plus, it has a built-in editor that can make your tutorial polished. You can draw shapes, input text, add callouts, insert pictures, add stickers, and more.
Here’s how to start a live on Instagram through pre-recorded video:
1. Start by getting the free download of AnyMP4 Screen Recorder. Install the screen recording software and let the installation process complete.
2. After installation, launch it on your computer and select the Video Recorder mode. Choose your recording screen and enable webcam, microphone, and system sound.

3. Once everything is set up, click the big red REC button to begin capturing your screen activity. Walk through the steps of your tutorial, narrating clearly and concisely.

4. While recording, click the Toolbox to focus and spotlight, zoom in and highlight, add callouts, and more. Once finished, click the Square button to end the recording.
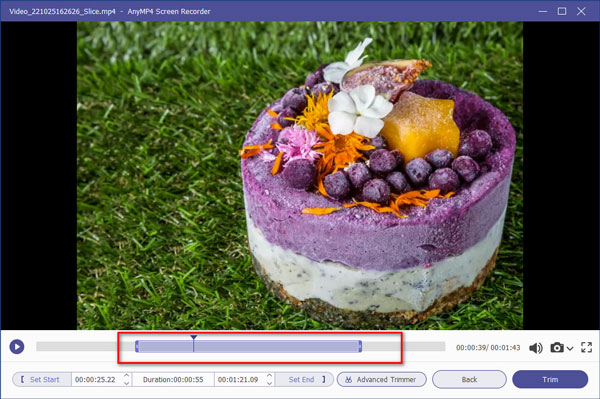
5. A preview window will appear. Play back your recording to ensure you captured everything you need. If needed, trim unwanted sections of your recording.
6. Once satisfied with your recording, click Done to download Instagram live video.
AnyMP4 Screen Recorder’s functionalities extend beyond preparing content for Instagram Live. You can use this tool to create high-quality tutorials for other social media platforms. It also comes with additional features like Video Compressor. This allows you to compress video for Instagram to meet the required file size for Instagram Live.
Live Stream the Edited Video on Instagram
LiveReacting lets you schedule and publish pre-recorded videos as if they were live. This is a great option for those who are camera-shy or want more control over the content they’re presenting. Additionally, it provides tools to manage your live streams more effectively. You can schedule countdowns, display audience comments, and invite guests to co-host your stream.
Here’s how to get live on Instagram using LiveReacting:
1. Log in to your LiveReacting account and navigate to the video upload section. Upload your pre-recorded and edited video file.

2. Once uploaded, customize your live stream. Add a title, description, and thumbnail image for your stream. Also, you can add interactive elements like polls or quizzes.
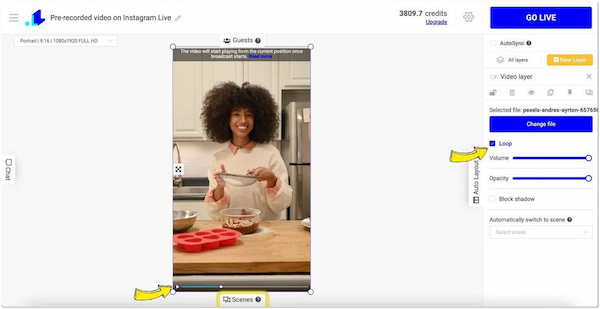
3. Locate the settings for connecting to your Instagram account. Follow the instructions to grant the tool access to your Instagram Live functionality.
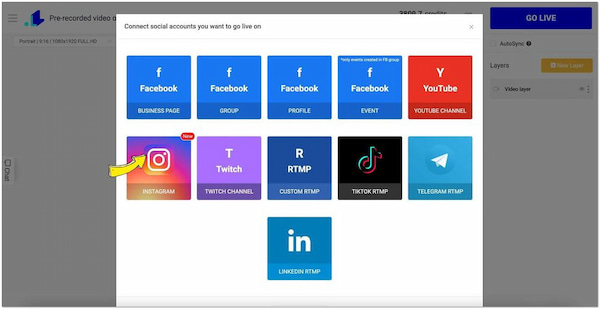
4. If you don’t want to use Instagram’s built-in Live functionality, LiveReacting offers a custom stream key within their platform. Use this key to launch the live stream.
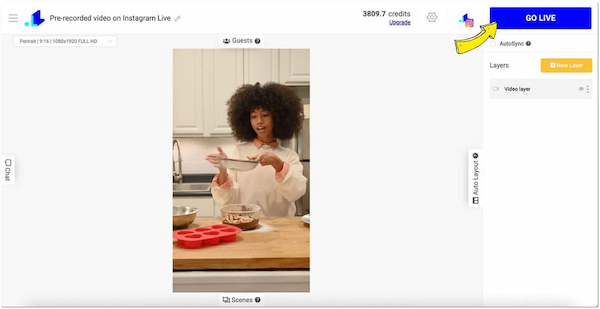
LiveReacting is a go-to solution to live stream your edited video on Instagram. However, there’s a catch. It isn’t a built-in feature of Instagram Live. It’s actually a separate software designed to enhance live streams. Also, features like custom stream keys and advanced scheduling are unavailable on free plans.
Part 5. Best Time to go Live on Instagram
There isn’t a one-size-fits-all answer to the best time to go live on Instagram. However, there are some general guidelines and factors to consider to maximize your reach and engagement:
| Day(s) |
Time |
Reason |
| Monday to Friday |
12:00 PM or 7:00 PM to 9:00 PM |
This is generally considered a good time to target people during their lunch breaks or downtime between work tasks. |
| Saturday and Sunday |
9:00 AM to 11:00 AM or 4:00 PM to 6:00 PM |
People are more relaxed and have more free time on weekends. This makes them potentially more receptive to live streams. |
Note: Don’t be afraid to experiment with different times and days to see what works best for your audience. Try out a few live streams at different times and track the engagement metrics to identify recurring patterns.
Part 6. Why Am I Not Eligible to Go Live on Instagram?
There are several reasons why you might not be eligible to go live on Instagram:
- • Account Age: Your Instagram account needs to be at least 30 days old to access the Live feature. This is a measure by Instagram to reduce spam and ensure some level of account establishment.
- • Account Type: You can only go live on Instagram with a public account. Private accounts, where your content is only visible to approved followers, are not eligible for Live streams. This is because live broadcasts are intended for a larger pool of viewers.
- • App Permissions: The Instagram app needs permission to access your device’s camera and microphone. Granting these permissions allows the app to broadcast what your camera sees. Without these permissions, Instagram Live simply won’t function.
- • Account Restrictions: Your account might be temporarily restricted from using certain features, including LivE. This might be due to violations of Instagram’s Community Guidelines. Check your account status within the Instagram app settings.
- • Technical Issues: Sometimes, temporary glitches within the Instagram app can cause unexpected behavior. Try restarting your app or device and see if the issue persists.
Part 7. FAQs about Going Live on Instagram
How to turn off comments on Instagram Live?
If you want to disable comments while hosting an Instagram Live session, here’s how: Start your Instagram Live stream. Once live, tap anywhere on the screen and hold your finger down. A menu will appear with various options. Select Turn Off Commenting. This will hide all existing comments and prevent viewers from posting new ones during the livestream.
How to turn off live notifications on Instagram?
Unfortunately, Instagram doesn’t currently offer a way to turn off live notifications for all live streams in general. However, you can control who receives notifications. Go to your profile page and tap the three lines in the top right corner. Select Settings and then Privacy. Navigate to Live Video and choose who you want to be notified when you go live.
Can you play music on Instagram Live?
YES! But playing copyrighted music on Instagram Live can be tricky. Instagram adheres to copyright laws, and playing music without permission might mute your livestream or even lead to account restrictions. Use royalty-free music sources that allow streaming instead.
How many followers do you need on Instagram to go live?
The number of followers isn’t a requirement for going live on Instagram. As long as your account is at least 30 days old and set to public, you can access the Live feature regardless of your follower count. This allows everyone to use live streaming and connect with their audience.
Conclusion
Now you have a complete guide on how to go live on Instagram! Remember, experiment and find what works best for you and your audience. If the idea of a fully live stream seems daunting, there’s an alternative! Although Instagram doesn’t allow direct live streaming of pre-recorded videos, worry not! You can achieve a similar effect using computer screen recording tools like AnyMP4 Screen Recorder. It lets you capture and edit your video content. Then, software like LiveReacting can be used to connect to Instagram Live. It lets you broadcast your pre-recorded video as a live stream.


