How to Enlarge Image With 7 Photo Resizer
All those moments of yours are always worth capturing. They are indeed precious to you. Similarly, your images are worth displaying as well. As you display them through printing or digital media, you always have to find a way to enlarge them. This post will teach you how to enlarge an image without losing quality. Unleash your creativity by making pictures bigger and better. Make your photos enlarged but with crisp details. Kindly continue to read more below to know the easy steps, to begin with.

Part 1. Enlarge Image with AnyMP4 Image Upscaler Online
AnyMP4 Image Upscaler Online
Platform: Web
Price: Free
Supported image formats: JPG, JPEG, PNG, BMP
PROS
- Easy user interface.
- Has magnification level option.
- Accessible online.
- Free to use.
- Shows output size.
CONS
- Limited features since it's free.
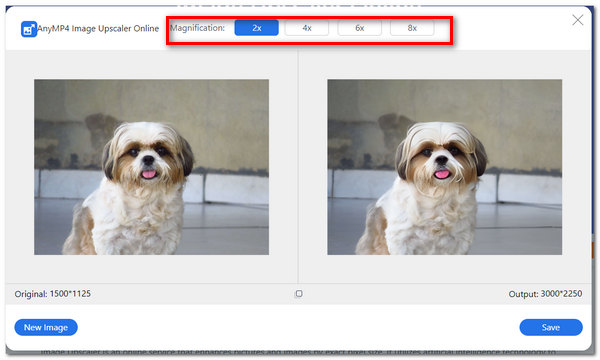
AnyMP4 Image Upscaler Online is a web-based tool that focuses on upscaling and enlarging an image online. The tool is free to all. Furthermore, it is powered by Artificial Intelligence (AI) technology to help reduce noise and enhance sharpness in photos. AI technology helps in enlarging images online without compromising the quality. Moreover, it has a magnification level that ranges between 2X, 4X, 6X, and 8X times. The excellent thing about this tool is that it does not add any watermark to your finished work.
Additionally, it uses a particular algorithm to improve the photo's details, edges, and lines. Indeed, this will make your work easier in enlarging your images without losing quality. The great thing is it improves the quality of images instead. Below are the straightforward steps you can follow to enlarge your photos without losing quality.
1. Visit the AnyMP4 Image Upscaler Online on its official site.
2. On the main interface, start importing your photo by clicking Upload Photo.

3. After uploading your photo, you can enlarge the image without quality loss by selecting any magnification between 2X, 4X, 6X, and 8X.
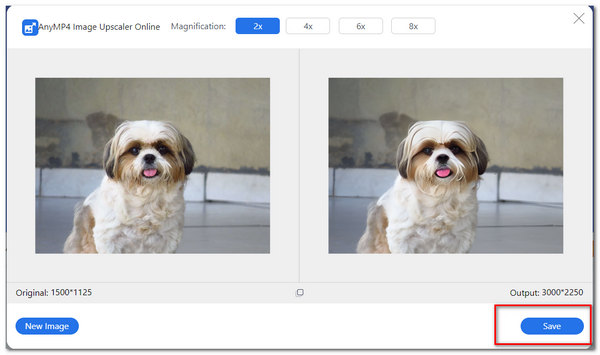
4. After upscaling your photo, you can click Save to save and download your image on your phone and successfully upload the finished work on Instagram.
Part 2. Make Image Larger With Adobe Photoshop
Platform: Windows 10,macOS
Price: $20.99
Supported image formats: JPEG, JPG, PNG, GIF, SVG
PROS
- Advanced photo-editing tools.
- Multi-purpose software.
- Better quality of images.
- Can generate high-end graphics.
CONS
- Complicated user interface for beginners.
- You still need to purchase it before getting the whole experience.
Adobe Photoshop is a powerful photo-editing software you can install and download on your PC. Additionally, Photoshop is used by many editors, graphic artists, and professional photographers globally. It is composed of the most advanced features in photo editing tools. It can enhance different images and other illustrations. Moreover, it is also used in photo retouching. Similarly, this tool can enlarge a photo without losing quality. The following steps are below.
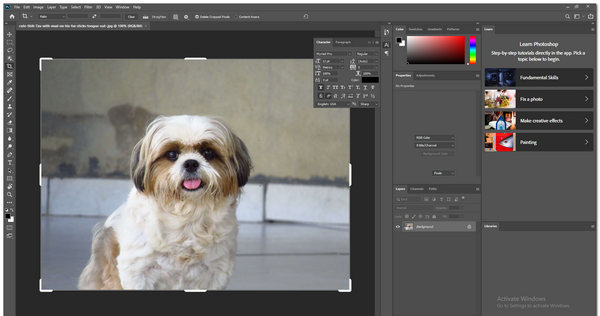
1. Download and install the latest Adobe Photoshop
2. To import your image to the software, click File. Then select Open. You can now like the image file you want to enlarge.

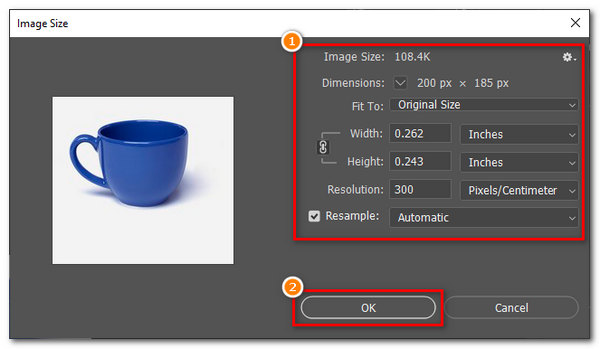
3. To enlarge your image, click the image. Drag down your cursor, then select Image Size.
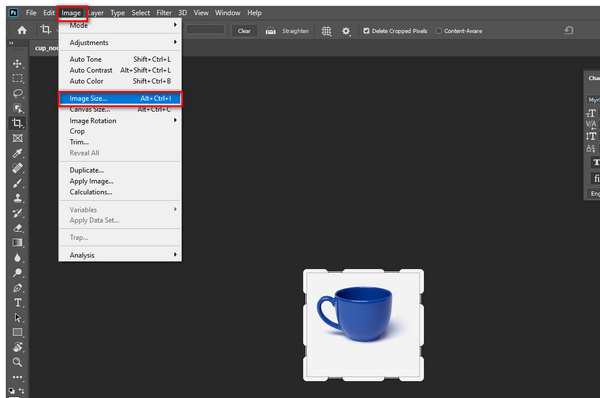
4. A dialog box will appear. It will let you edit the image size by entering values on its height and width to enlarge your image.
5. After enlarging your image, click OK on the lower part of the box to finalize.
Part 3. Enlarge a Photo with Adobe Illustrator
Platform: Windows, MacOS
Price: $19.99
Supported image formats: PNG, GIF, JPG, JPEG, SVG, BMP, HEIC, JPEG2000
PROS
- Has free trial.
- Creates image files in manageable sizes.
- Has extra features.
CONS
- It requires a lot of space on your PC.
- Limited support for some graphics.
Adobe Illustrator is an application powered by Adobe that focuses on editing vector graphics. The tool also provides features for photo-resizing in pictures. It also has different scaling options to select. Thus, you can indeed enlarge an image without quality loss by using this software. Moreover, it maintains the integrity of the image through the advanced features available in the tool. There are many methods for enlarging the image without quality loss. But, we're only going to use one method; the Scale tool.
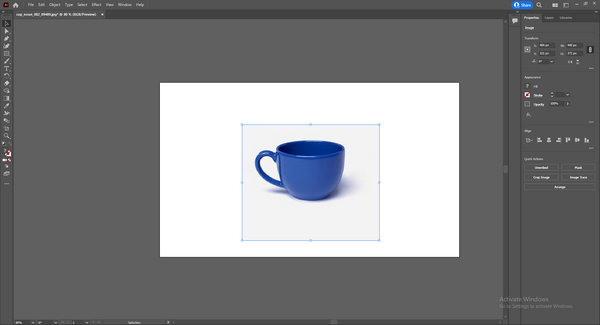
1. Download and install the latest Adobe Illustrator
2. To import your photo into the tool, click File on the menu toolbar. Select Open to import your image file.

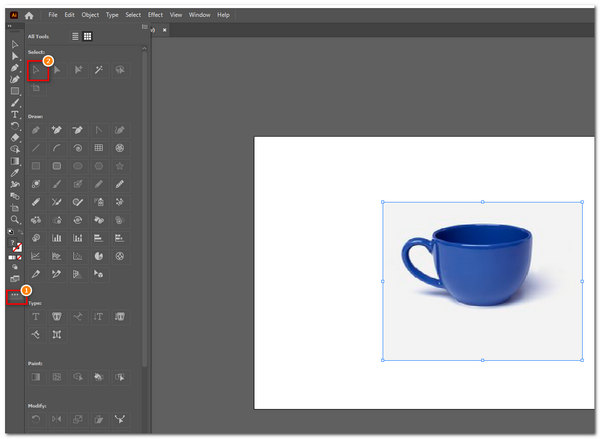
3. To start enlarging the image, click the three dots icon on the app's left pane. Then select the Selection tool with a cursor icon on top of the tools. This will let you highlight the image.
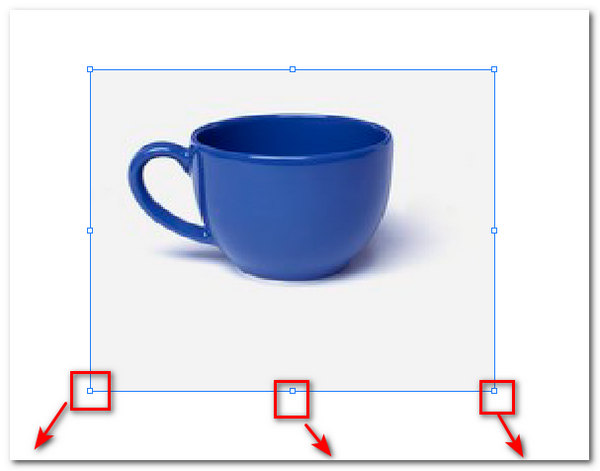
4. Highlight the image on the tool. Then you will see the drag-sizing handles around the sides of the image. You can drag them to enlarge your photo according to your preference.
5. To export your enlarged image, click File on the menu toolbar. Drag down your cursor, then select Export. Then click Export As.
Part 4. Make Image Bigger with FastStone Photo Resizer
Platform: Windows 10/11
Price: $19.99
Supported image formats: JPG, JPEG, JPEG2000, PNG, BMP, GI, TIFF, PCX, EMF, ICO, HEIC,WEBP
PROS
- Can do a batch resize in images.
- Can do the basic enlarging of image.
- Has advanced options to enlarge an image.
CONS
- It doesn't have a friendly user interface.
- Offline use only.
FastStone Photo Resizer is an offline-based tool that focuses on resizing an image. This is a great tool to enlarge your images without losing quality. Moreover, it is also an image converter and renaming tool. It has crop and rotates features as well. It uses the Drag and Drop mouse operation for you to utilize the tool well. Below are the steps to follow in enlarging photos.

1. Download and install FastStone Photo Resizer on your PC.
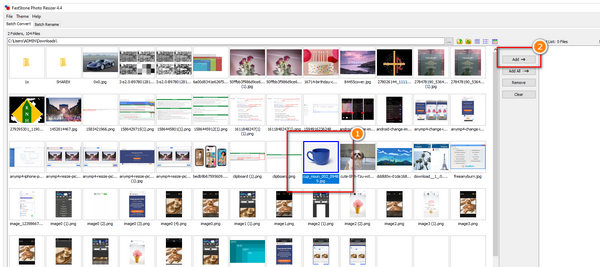
2. The tool will automatically let you see your computer stored image files. Select any file you want to enlarge, then click Add with an arrow icon.
3. Highlight the image name on the box. Then select Advanced Options on the bottom part.
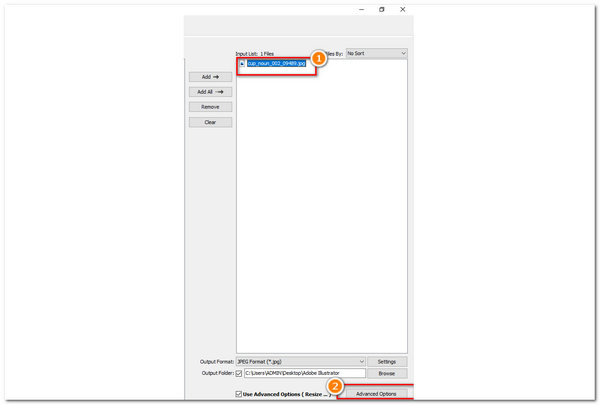
4. A dialog box will appear in Advanced Options to start enlarging the image. Select Resize; then you can select if you want to enlarge your image in Pixels, Percentage, Print Size, or on one side only. Select OK to finalize.

Part 5. Enlarge a Picture with ImgLarger
Platform: Web
Price: Free
Supported image formats: JPG, JPEG, PNG, GIF
PROS
- Can enlarge images easily.
- It has a lot of extra features in editing.
- Amicable user interface.
CONS
- Requires you to log in to a free account.
ImgLarger is an online-based tool that can make your photos larger. It is powered by Artificial Intelligence (AI) technology. That is why it has many AI features you can use. It not only enlarges your images but also makes them better and smoother, reducing noise and sharpening. It improves low-quality pictures in an instant. Additionally, it is an all-in-one toolkit to enlarge a photo and upscale it without losing quality.
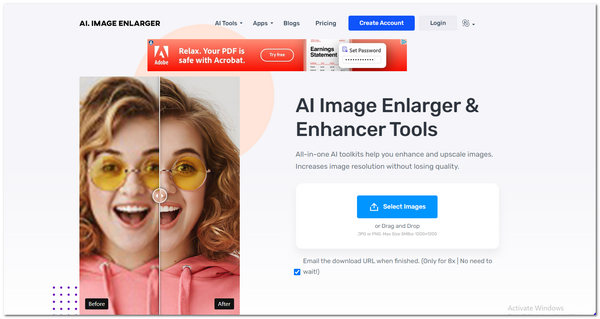
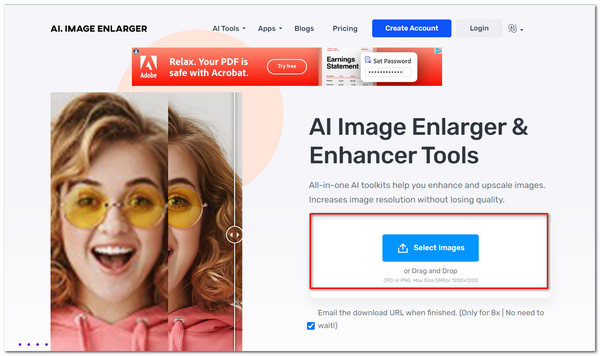
1. To start uploading your photo to be enlarged, you can browse an image file or drop the File. Ensure that you have logged in to your free account.
2. After uploading the photo, click Edit beside the file name you uploaded.
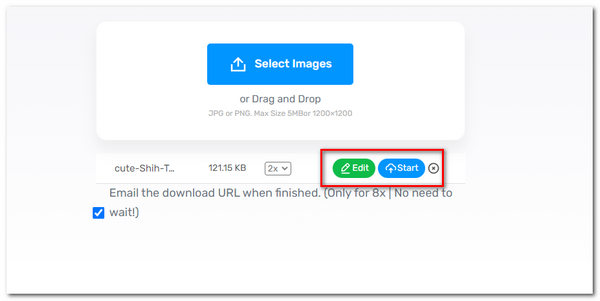
3. It will then redirect you to the editing part of the tool. The editing tools are in the left pane of the tool. You can start enlarging your image by dragging the handles on the image's edges.

4. Click Done to finalize.

Part 6. Make Photos Larger with GIMP
Platform: Windows, macOS, Linux
Price: Free
Supported image formats: BMP, GIF, PNG, SVG, PSD, TIFF, JPEG, TGA
PROS
- It has a lot of advanced features as well.
- Can do essential functions of enlarging an image.
- Free to use.
CONS
- Complicated user interface.
- Requires a lot of space on your computer.
GNU Image Manipulation Program (GIMP) is an advanced image editor. Moreover, it is also used mainly by many graphic designers, illustrators, and photographers globally. Also, it is similar to Adobe Photoshop because of its user interface and extra features. The tool is capable of enlarging your image without losing quality. Additionally, you can be creative in using the customization options. Similarly, it has image management features available for digital images. Below are the steps in enlarging the image without losing quality.
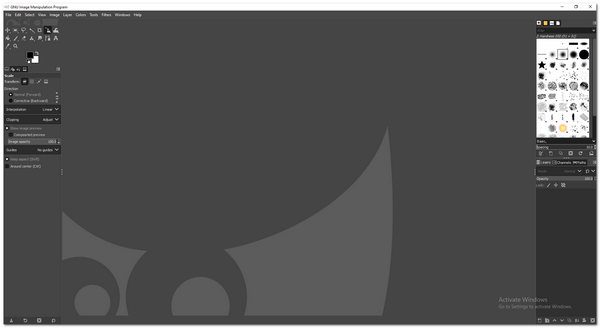
1. Download and install GNU Image Manipulation Program on your PC.
2. Open GIMP. To add your image, select File. Then click Open to import your image.

3. On the editing toolbar on the left, select the Scale tool.
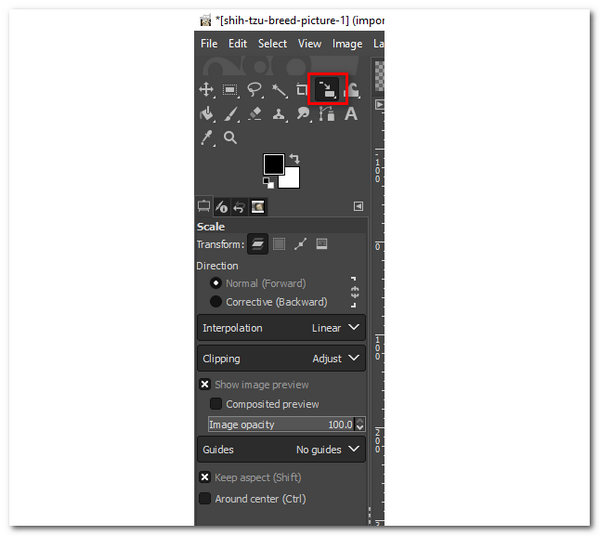
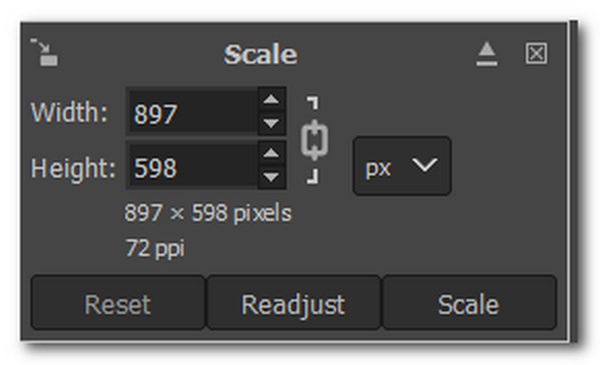
4. To enlarge your image, set the measurements by putting up the values. You also have the option to click Scale to adjust the handles on the image manually.
Part 7. Enlarge an Image with Adobe Lightroom
Platform: Windows, macOS
Price: $9.99
Supported image formats: JPEG, HEIF, TIFF, PSD, DNG, HEIC, CMYK
PROS
- The most straightforward user interface to use among Adobe tools.
- Can do basic resizing of images.
CONS
- Limited features because it is not free.
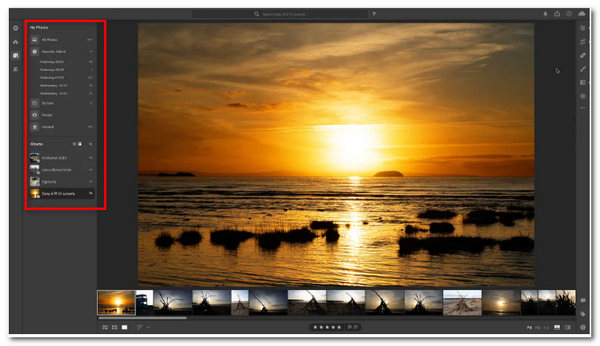
Adobe Lightroom is also a powerful editing software created by Adobe. It is a raw converter that photographers and other professionals use. Unlike other Adobe tools, Lightroom has the most straightforward interface. You can also enlarge your images without quality loss in this tool.

1. Download and install Adobe Lightroom to your PC.
2. You can enlarge your images when they are exported. Go to the Grid mode of the library. Or press the shortcut G. Highlight the image you want to enlarge. Click on the Export button.

3. A dialog box will show. Under Image Sizing, adjust the image resolution. You have the option to put a check on Resize to Fit. This feature will let you enlarge photos in specific measurements.
Part 8. FAQs on How to Enlarge Photos Without Losing Quality
How to enlarge a JPEG file?
Open your image file using photo-editing software. Select the Resize option and then enter the preferred size. Save and download your image.
Will my photo become blurry once enlarged?
If you use the right software that you prefer, that cannot happen at all. Some tools can make your photos blurry once enlarged, but most won't.
How can file size affect the quality?
It does not affect the image quality. It only slows down the viewing time for the viewer.
Conclusion
To sum up, enlarging your photos is one way to display them better. The purpose of enlarging is to make our images more visible to viewers who will check our works. Now that you know how to enlarge your pictures, you may try the abovementioned tools. Without requiring many technical skills, you can achieve it.


