Canon, Nikon, and Blackmagic are popular cameras that produce high-quality image files. Besides JPEG, many digital cameras shoot pictures in RAW format. Though RAW files have excellent quality, they can take up a lot of space. In addition, you cannot open them without the help of a third-party app. We have the best solution if you are still trying to find the most convenient way to turn your RAW files into a compatible format without a quality loss! You can check below the top four programs you can depend on to complete the job. So without any further discussion. Let's begin!

Raw image formats are usually slightly processed data from image scanners, like digital cameras and motion picture scanners. In other words, RAW files are unfinished products that cannot be printed or uploaded on a website. Generally, these image files contain camera sensor metadata, image thumbnail, image metadata, a short header, and a key code or time code.
Raw files have hundreds of types, including CR2, CR3, CRW, NEF, DCR, KDC, K25, RAF, RW2, 3FR, and more. Though most of them are based on TIFF file format. These formats differ minimally due to the extra image tags and unconventional file headers they use. To conclude, RAW photos occupy a lot of storage space because they are uncompressed.
Check more details about different image types here.
AnyMP4 Video Converter Ultimate is your go-to program to convert RAW to JPG. It is a multi-functional program that works as an image converter, besides the video conversion it offers. This program supports countless input image file formats, including RAW files based on TIFF formats. With it, you can import as many image files as you want and convert them simultaneously without losing quality. You can convert your imported files into the most-used formats, like JPG/JPEG, PNG, BMP, etc.
Moreover, besides the mass conversion it offers, you can adjust the image quality and size for a much better output file. You can also use AnyMP4 Video Converter Ultimate to edit and enhance your image as you desire. As mentioned earlier, it is a multi-functional program with many functionalities. Its Toolbox comes with over twenty tools for your video, audio, and image editing needs.
To convert RAW to JPEG, follow the instructional guide below.
1. Beforehand, download the RAW converter and install it on your available OS. Then, launch it afterward.
Secure Download
Secure Download
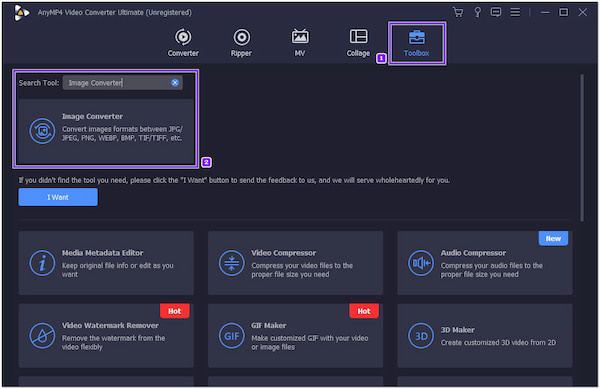
2. After launching the program, hover your mouse over the Toolbox tab and select the Image Converter.
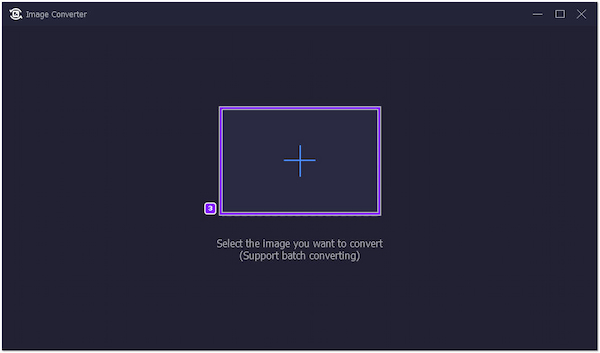
3. A new window will appear on your screen. Click the Plus icon to proceed, then choose the target RAW file based on TIFF format and import them into the program.
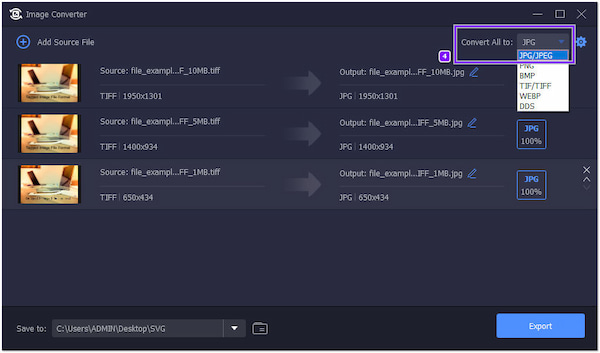
4. Once the files are uploaded to the program, navigate your cursor to the Convert All to tab and choose JPG/JPEG as your new file format.
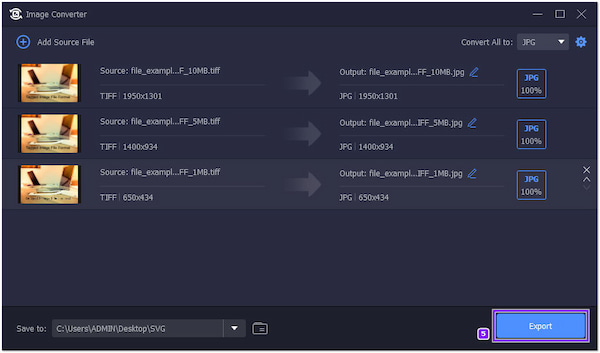
5. When done, choose the file destination to save the converted file. Then, click the Export button to initialize the conversion of your new file.
When you want the best quality copy of your file, click the Cogwheel icon next to the Convert All to tab. From there, adjust the slider to 100% to get the highest possible quality of your converted file.
Many photographers use Adobe Lightroom to make advanced and basic image edits, including RAW. Also, you can convert CR2 to JPEG through the export process of Adobe Lightroom.
Here's how to do so.
1. Open Adobe Lightroom and head to the File, then select Import Photos and Videos to add the CR2 file to the program.
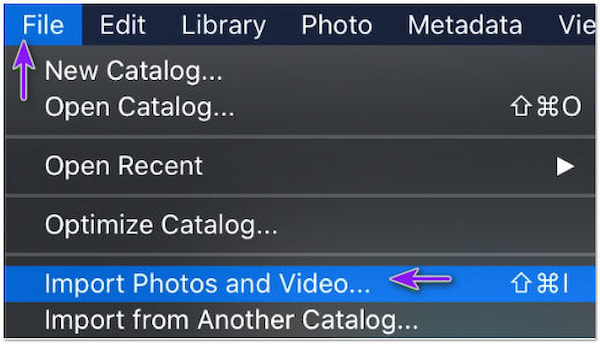
2. The program's import window will appear on your screen, then look for the files you wish to import. Check the box of each file to select them for import.
3. Once all image files are loaded into the program, click the File followed by Export. Proceed to the File Settings tab to save the image as JPEG. Next, click the Export to save the RAW file into a new format, JPEG.

Before exporting the RAW file, you can edit the images from the Develop tab. In addition, you can also modify export settings, such as name, size and quality, and export location, before you completely export the file.
Like Adobe Lightroom, you can also edit your images in Adobe Photoshop. Yet, it has much more in-depth capabilities than the basic editing offered by some editing programs. Besides that, you can also use Adobe Photoshop to convert RAW to JPEG. The process of the conversion of RAW is also similar to Adobe Lightroom. If you want to learn how to conduct it, follow the steps below.
1. Go to the File and choose Open to select the image files you wish to open and convert.

2. Since you are opening a .raw file, the Camera Raw window will be opened automatically. You can make edits to your image as you desire. Once done, click Open to open your image in Adobe Photoshop.
3. After the necessary edits you made, it's time to save your file in JPEG format. Click the File, then select Export followed by Export as. Next, go to the File Settings and, hit the dropdown menu next to Format, choose JPEG.
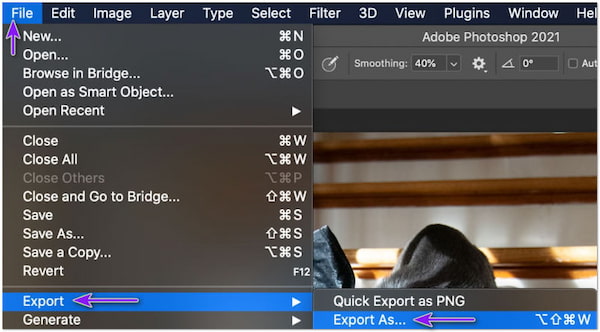
You can modify other settings like Adobe Lightroom, like change file location, improve image quality in Photoshop and more. It would be best to set the quality to Great or Excellent to maintain the best possible image.
The simplest way to turn your RAW files into the most compatible format, like JPEG, is by using Mac's pre-installed program, Preview. It enables you to view and manage your images. Besides that, you can use this program as a NEF to JPG Converter. Many Mac users overlook this program and assume that the program's primary function is to open and look for your images. Yet, there are many more uses that you can get from this program if you know where to look.
Here's how to change a RAW file into JPEG format using Mac Preview.
1. Firstly, open Finder and look for the RAW image you wish to convert. Right-click the image file and click Open With, then select Preview from the options.

You will see that the file extension is .nef, which is the RAW file format of Nikon. The image file may differ, yet the process will remain the same.
2. Once the Preview window is open, same with the selected image file, go through the File and select Export. On the window that will appear, click the dropdown next to the Format.
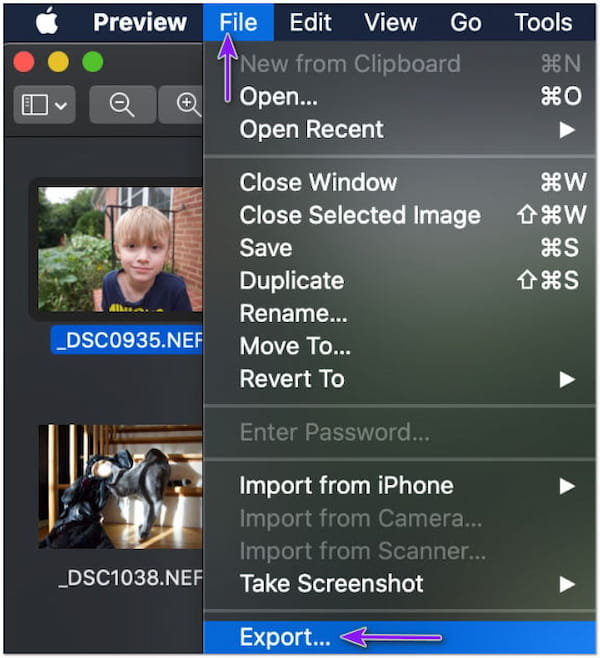
3. Select JPEG as your new format from the options from the list. Also, you can name your file and choose a file destination where to save it, then choose your compression preference. When you're done, click Save.
Completely within the Mac Preview, the RAW file will be converted into a JPEG format. In addition, the RAW file won't be lost as it will create a duplicate copy of your original file! Instead, you'll be given a RAW and a JPEG copy of the same image.
1. RAW vs. JPEG, what is the difference?
When you shoot an image from a digital camera, it will be recorded as RAW data. On the other hand, when the camera format is set to JPEG, the RAW data will be processed and compressed before it is saved in JPEG. However, no processing will be applied if the camera is set to RAW. Therefore, the file will store more color data.
2. How to take raw photos on an iPhone?
With iPhone 12 Pro and later (iOS 14.3 and later), you can take images in ProRAW. To do so, go to Settings. Then, look for the Camera and select Format. Under the Photo Capture, turn on the Apple ProRAW. Afterward, go to your Camera app and try to take a ProRAW photo. Tap the RAW on your Camera app.
3. How to open a RAW photo on an Android?
You can use a RAW Image Viewer available on Google Play Store. With it, you can open and view camera RAW image files like BRAW, CR2, CR3, ERF, EIP, DCS, and more. In addition, you can also use this app to convert your RAW file into another format like JPEG, PNG, and PDF.
Converting RAW to JPEG is now easier with the help of the listed programs. All of them can help you with your conversion needs. Yet, some of them are too complicated to use. We highly recommend AnyMP4 Video Converter Ultimate as the fastest and easiest way to convert your files. What do you think about this post? Rate us if this post has helped you with your concern.