Do you own an iPhone? Or a Mac device? If you do, then this article will benefit you. The common feedback about macOS and iOS devices is that you can not insert external memory. Meaning you have a limited amount of storage to put your files in. Music lovers will not benefit from this so much because they will not be able to store many files. Nonetheless, we are here to give you a resolution to this concern. You will learn how to compress audio files in iTunes with this post. Continue reading below to absorb the full details on reducing music file size in iTunes.

iTunes is a digital media player software and application specifically developed by Apple Inc. and is available on Apple devices like iPods, iPad, iPhones, and Macbooks. It lets you play and organize your audio files to download, convert, and manage audio files, audiobooks, ringtones, and podcasts. The desktop version of iTunes lets you compress the file size of your songs and recordings.
Note that iTunes is available on Windows and Mac computers. But macOS Catalina has replaced iTunes with Finder.
With the knowledge now established for you about this software application, let us proceed to the tutorial on how to compress an audio file in iTunes.
1. The first step is to download iTunes if you are using a Windows desktop. Launch it first then you will immediately be at the start interface.
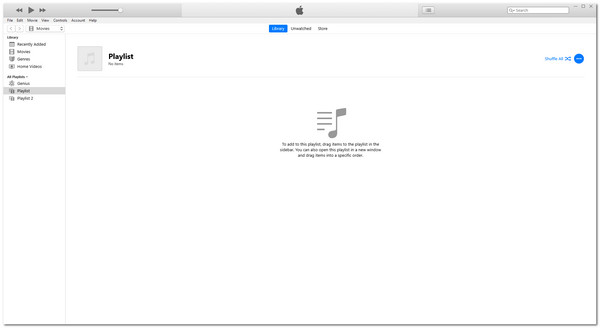
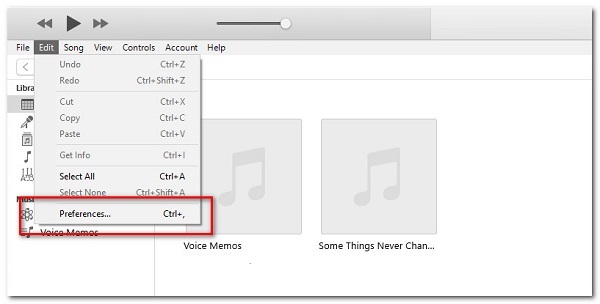
2. The menu selections are at the top-left corner of the interface. Select Edit, then under that click on Preferences. After this, you should see the General Preferences pop up.
3. The app will automatically direct you to the General settings. Afterward, select Import Settings. Following, change the Encoder to MP3 Encoder. Under here is the Setting. Change it to Custom. Adjust the kbps from 16 to 320. Lower the kbps if you want a smaller size.
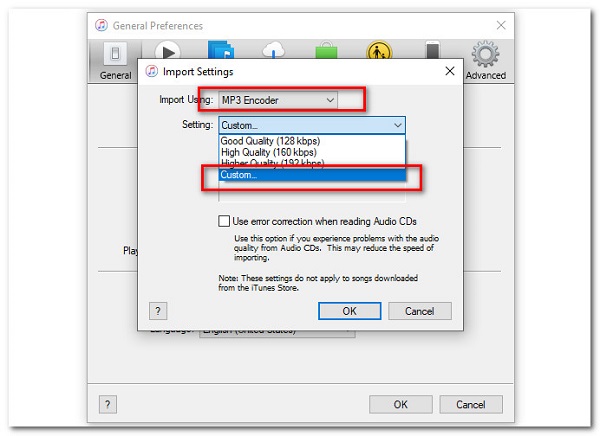
4. After that, finalize this audio file compression procedure by converting it and turning it into an MP3 version.
So, how can you use the compressed audio files on your iPhone? Simply transfer the tracks and music files from your iPhone to iTunes on this computer. Then use iTunes to reduce the music file size. Once the process is done, you can sync songs from computer to iPhone with iTunes. Do this by uploading the compressed audio on your iCloud or sharing the audio files using a cable wire from your phone to your PC. Take note that we will use the desktop or mac version of the software to compress your files.

Even the most superficial features and apps have a significant impact on users. But this does not only apply to positive feedback. Minor bugs are also quite annoying and can ruin the user experience. An example of a fatal error on iTunes is if the audio compressor does not work. What would you do? Let us know in the next part of this article.
This part will provide the basic troubleshooting (BTS) procedures to fix a non-responsive audio file compressor in iTunes.

Resolution 1: The first BTS you should perform is restarting your device. This procedure is applicable both on your Windows and Mac device. Sometimes our devices just need a little reset so they can function correctly.
Resolution 2: Check on the built-in Help page of the software. This panel shows key terms that will significantly help you with these bugs to fix audio compression failure in iTunes.
Resolution 3: You should also see the system requirements for utilizing iTunes. Make sure it meets what the system needs for full functionality.
Resolution 4: Test the procedure on a different user account. It can help in figuring out the faulty function in your software.
Resolution 5: Reset the setting of iTunes into default. There might be unexpected changes made to the settings of your software. Note that if you reset it, all the customization will be unsaved.
Resolution 6: The last troubleshooting you should do is to reinstall the software from your device.
If these things do not work, maybe it’s time to use different software. Perhaps an alternative, don’t you think? Well, we are here to cover that need for you! Please continue reading to discover the best alternative for iTunes!
iTunes is great software; however, with the current updates for Apple Devices, iTunes is no longer available for Mac devices. This is why we present a substitute relative to the prior program and would be viable for Macbook users. We have looked around the web and found two of the best tools to compress your audio files! It is essential to mention that one of the software is offline, and one is online. With that said, let us now know what these program tools are.
Presenting AnyMP4 Video Converter Ultimate is one of the best video converters. This iTunes compressor alternative allows you to upload your audio files and reduce the storage size of it within the program.
It can convert the audio to other formats if you want. This audio compression feature is located in the same setting. Additionally, It enables you to change the Channel, adjust the Sample Rate, and increase or decrease the Bitrate. After editing your audio file, you can Preview the compressed audio and listen if you are pleased with the result.

Let us not ignore the fact that it is an excellent audio compressor alternative to iTunes. It has a lot of positive and great features. These unique functionalities are listed below:
Recommendation
Let us show you how to compress the audio file size with AnyMP4 Video Converter Ultimate for Mac.
1. Access the website, then download it by clicking on Free Download. Install it. Afterward, Launch it.
Secure Download
Secure Download
Look at the far right on the top selection, then click on Toolbox. Under that, you should see the Audio Compressor. Select it to start the procedure.

2. Upload your audio file to proceed with compressing the audio. It will take you to a page where you can adjust the setting for your audio file. You can adjust the Size, Channel, Format, Channel, Sample Rate, and Bitrate. For simplicity, we will change the file size.

3. After adjusting the audio file's settings, you can Preview it by clicking on the button to listen to the audio. If satisfied with the results, proceed by clicking on the Compress button at the bottom-right corner.

With those basic steps, you can now make a 3D video and 3D photo with a GIF maker.And that is how to compress your audio files with iTunes audio compressor alternative, AnyMP4 Video Converter Ultimate on Mac. If you are concerned since you do not own a Mac device, do not worry. We will provide you with online software that can give the same function and results.
We give you AnyMP4 Audio Compressor Online, the ideal audio compressor for all users to replace iTunes. As the name states, free web-based software lets you compress your audio files while maintaining quality. That is what iTunes does not possess.
Similar to its offline variant, it allows users to reduce the Size of their audio files, convert the Format, change the Channel, and adjust the Sample Rate & Bitrate. That is more what iTunes can do for you. It is very straightforward and highly accessible. It has a fast-paced compression speed. Plus, it maintains the quality of your tracks.

With this now introduced, we can proceed with the guide on reducing audio file size using this iTunes audio compressor online.
1. Go to the website or access AnyMP4 Audio Compressor Online to Launch the web-based program. Immediately at the center, you will see Upload File. This button is where you can upload the audio file. Select the track to get started.

2. It will take you to the compressing page. At the left interface, you should see all the settings. You can reduce the file Size and change the rest of the settings to your preferences. On the Size, drag the indicator to how much size you want it to have or type below it.
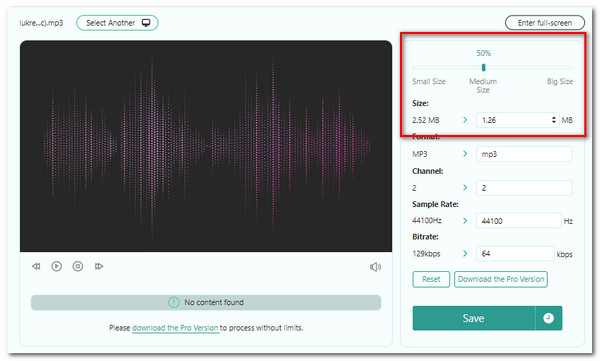
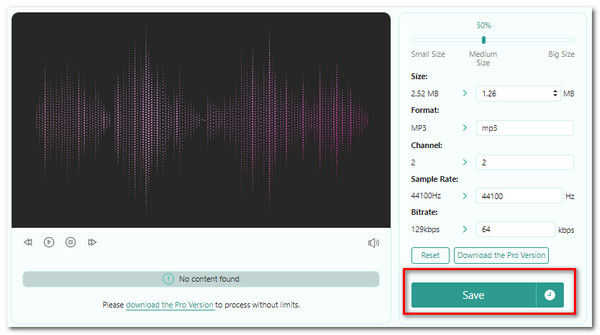
3. After compressing the size of your audio file, you can listen to it by clicking on the Play button at the interface on the left side. If you are content with the results, click the Compress button at the bottom-right corner to save your resized audio file.
These are great alternatives to iTunes because of their accessibility and availability on all devices. Plus, the procedure is much more than the steps on how to compress audio files in iTunes.
1. Is Apple Music and iTunes the same?
Apple Music is where you can find all of your music files. The music files include the audio files you downloaded or purchased from iTunes. iTunes is more of an audio file manager.
2. Can I put my iTunes library on iCloud?
If you have a subscription to Apple Music or iTunes Match, you can store all of your audio files in your iCloud Music Library.
3. Can I backup my iTunes library to external memory?
Yes. You can drag and drop the iTunes folder to the external drive folder. Also, you can backup iTunes library to Android phone for portable listening.
Congratulations on making it to this part of the article. We hope you now know how to compress audio files in iTunes with the guide we provided. For fewer errors and accessible usage, start using AnyMP4 Video Converter Ultimate and AnyMP4 Audio Compressor Online! Please share this article with your friends and families, and visit our website for related articles. Thank you!