How to Change Font Style & Size & Color on iPhone
By default, iPhone has a pretty common user interface for all of the users. However, lots of us will want to change the way iPhone look. One of the most concerns is the font, because we are reading the screen at all times.
However, the customization possibilities are somehow limited, when it comes to iPhone.
But there are a few things that we can still do to change the font to get a unique user interface.
What we shall talk is to change the font style, size and color on iPhone, running in iOS 13/14/15/16. No matter what you will jailbreak or not, you can also get the different fonts on iPhone.
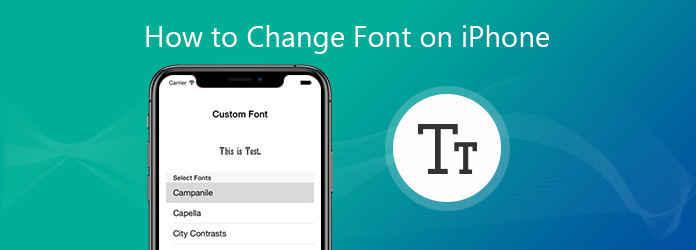
Part 1. How to Change Font Size on iPhone (Larger/Smaller/Bold)
Though Apple limited the changes of the font style on iPhone, it also meets the basic demands based on your vision.
If you have some difficulty in reading small texts, you can control to enlarge the font size. If you do not feel comfortable with the large font size, just de-crease it.
The settings of changing font size on iPhone are easy as following, and the steps also applied to iOS 16, iOS 15, iOS 14, and iOS 13.
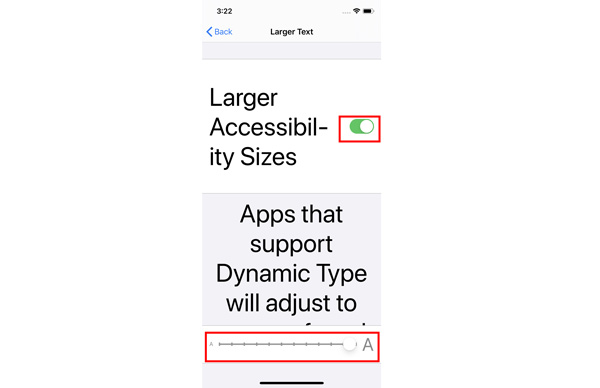
1. On your iPhone, open the Settings app, scroll down to find Accessibility, tap Display & Text Size, and hit Larger Text.
2. Drag the slider at the bottom of the screen to get the different font size as you wish.
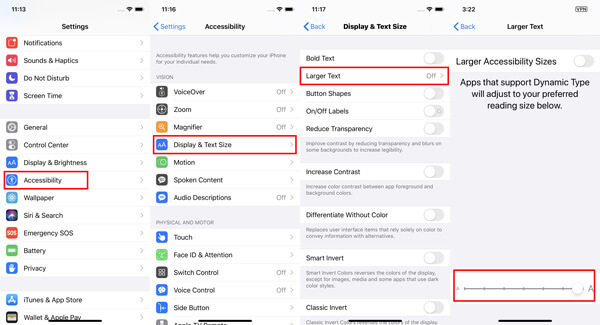
Note: If you want to get larger font size, just toggle on Larger Accessibility Sizes and then drag the slider, and the apps that support dynamic type will also change the font size as you drag the slider.
Part 2. How to Change Font Style for Videos/Books App on iPhone
In the early, the default font of iPhone is Helvetica and iPhone after 2010 uses Helvetica Neue with Retina display. After that, iPhone always adopt the classic font style.
Apple does not allow you to change the font style for the whole system-wide, but you can create a different font style specifically for such apps as Videos and Books on iPhone.
How to Change Fonts Style on your iPhone for Videos
1. Open the Settings app on iPhone, select Accessibility, scroll down to find Subtitles & Captioning, tap Style to change the style to Transparent Background, Large Text, Classic, or Outline Text.
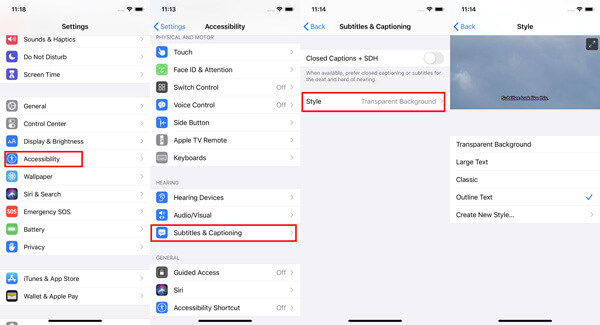
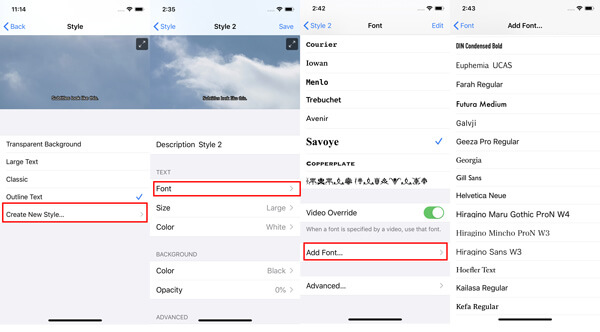
2. Do not like them? Just tap Create New Style to get a new customized subtitle style, where you can change the font, size, color and more for Text and Background. Font styles are various from Helvetica, Courier, Iowan, Menlo, Trebuchet, Avenir, Sayoye, COPPERPLATE, and more.
You can tap Add Font to add more font styles like Geeza Pro Regular, Myanmar Sangam MN, Tamil Sangam MN, Times New Roman, etc., as the new caption or subtitle text font size.
Moreover, in the iOS 18 update, Apple gives you the option to show or hide audio transcriptions for the announcements from HomePod under Subtitles & Captioning.
Then when you watch a video, you can watch the audio transcriptions with the font you like on iPhone.
How to Change Text Font Style on iPhone for Books
Another app that you can customize text font style is Books.
When the default font style tires your eye in reading the books on iPhone, it is time to change the font style.
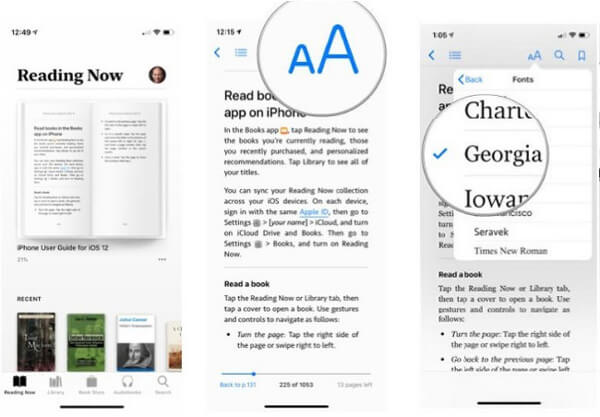
Open Books app on iPhone, and open one book downloaded from Store, tap the AA icon on the top of the screen, and an option box will open.
Now, you can change the font size to make the font smaller or larger while reading the book.
Besides, you can also get the font style changed and custom the themes freely.

AnyMP4 iPhone Transfer Pro
A better iTunes alternative to backup iPhone books, videos, music, contacts, and more data to computer, and sync data among iOS device, iTunes and computer quickly and safely.
Part 3. How to Change iPhone Font Style Without Jailbreak (Add New Fonts)
The above settings can only let you change the font style on iPhone or iPad that use the supported apps in Pages, Keynotes, Mail, and some limited third-party apps supporting the dynamic features.
What’s more, the number of the font size and styles are provided limitedly by Apple. For using the specific font styles like Italic, Waltograph, Bengali, Ethiopian, Farsi, OpenDyslexie, etc., you have to download and install the fonts on iPhone via the third-party apps.
Adobe Creative Cloud app is the font changer for system-wide fonts on iPhone or iPad running in iOS 14.5 and later.
What you should do is to create an account with a paid Creative Cloud subscription, but use the fonts for free.
1. Free download the Adobe Creative Cloud app for iPhone from App Store.
2. Run the app and tap Fonts tab on the bottom screen.
3. Select the font you like and tap Install.
4. After the successful installation, go to Settings app on iPhone, hit General and select Fonts.
Open the apps that are compatible with fonts’ changing like Pages, keynote or Mail.
Type the new type, head to the editor to look for your new installed fonts.

Similar apps are Font Diner, AnyFont, iFont, etc. that you can find from App Store, but such apps cannot change the system-wide font, but only be used by other apps which make use of the font book on iPhone.
Part 4. How to Change iPhone Font with Jailbreak (Download Font Apps)
Apple does not allow you to change the actual font on iPhone, but you can change the font itself after jailbreaking iPhone to install the third-party apps.
BytaFont 3 is a free jailbreak application, which allows you change the system-wide font on your jailbroken iPhone.
Note: For using the app, you should jailbreak your iPhone first, but the jailbreak iPhone will risk at the following things:
1. Void your warranty and make it immune to OTA update from Apple. (How to unjailbreak iPhone?)
2. Make your iPhone risky at being attacked easily by virus, data loss, etc.
Now, lets see the steps of changing the system-wide font on iPhone.
1. Install Cydia on iPhone. Search BytaFont in this app and install it. When the BytaFont 3 is installed successfully on your device, you can find the app on the springboard.
2. Go to Browse Fonts button on the bottom menu. Select the font you want to install, and tap Download, then you will be prompted to the Cydia package of the font. Just hit Install.
3. After downloading the font, close Cydia, open BytaFont 3, go to Basic section to tap the font you downloaded, hit Respring in the upper right corner and the new font will be changed on iPhone.

Part 5. How to Unjailbreak iPhone to Secure iPhone under Warranty
Part 4 is the ideal way to change the system-wide font and specific apps’ font after jailbreaking an iPhone, however, your iPhone will be at big risk.
For returning your iPhone to the original un-jailbroken status with keeping the warranty, you will need AnyMP4 iOS System Recovery is the iOS system repair tool, which can restore your iPhone to the factory settings as an original one.
Recommendation
- Unjailbreak iPhone running in iOS 18 and earlier iOS versions, from the jailbroken status as an original one.
- Wipe all content and settings from iPhone to clean the virus, adware, and malware.
- Fix various iPhone system issues, like loop restart, white scree, Apple logo, freeze, brick, etc.
- Downgrade and upgrade iOS to any supported versions for iPhone, iPad and iPod.
- Standard Mode repair iOS system errors without losing data on iPhone iPad and iPod.
Now, let’s break down the exact process of un-jailbreaking an iPhone.
Note: Do not backup your iPhone data, because this way will erase all content and settings on device. (Learn here to backup iPhone photos, messages, photos, contacts, etc.)
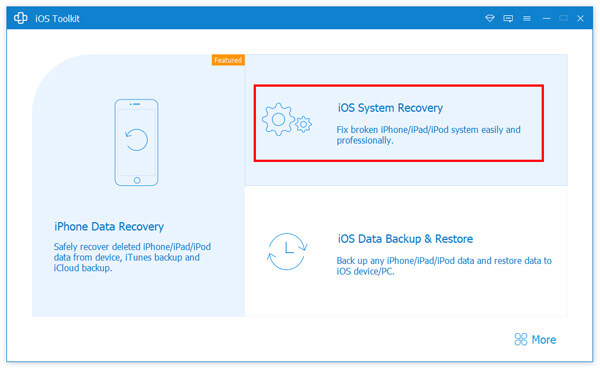
1.Select iOS System Recovery
Free download this software into your computer, install and run it immediately. In the main interface, you should select iOS System Recovery.
2.Connect iPhone
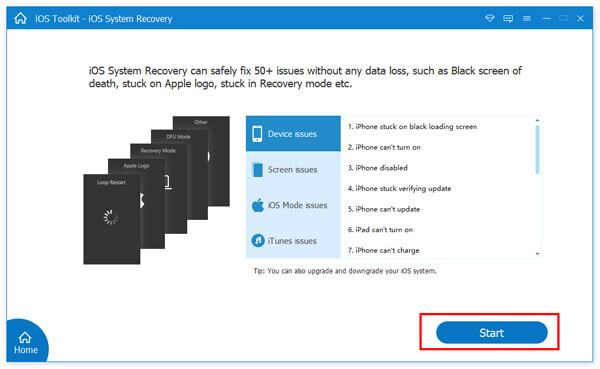
Get the USB cable to plug your computer with iPhone. Here, you will see the various issues that this software can fix. After seeing that, click Start.
3.Select Fix
Here, you will see the detected status of your iPhone as Normal.
Click the Fix button to continue.
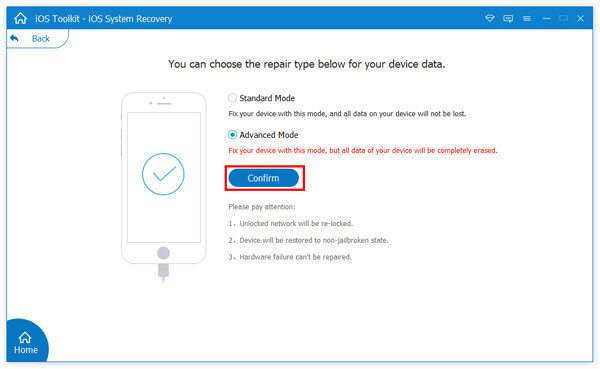
4.Select Advanced Mode
In the pop-up window, you need to select the checkbox of Advanced Mode, and click Confirm.
5.Un-jailbreak iPhone
In the popup window, you will see all the detected device information (Category, Type, and Model). If the information detected is not correct, just modify it manually.
Then select the iOS version that you will downgrade or upgrade to, and click Next to start downloading the firmware and un-jailbreak your iPhone.

Conclusion
This post shares ways of changing fonts on iPhone and iPad. The settings on iPhone can let you change the font size to get a small or large font size, and customize the font styles for some apps. Using the third-party apps can let you install and add new font styles to change the system-wide fonts. But, jailbreaking iPhone to change the system fonts may put your iPhone risky, so you should use iOS System Recovery to un-jailbreak iPhone to secure the data.
Any question you have while changing the iPhone fonts, do not hesitate to leave your comments below.


