Recording a PowerPoint presentation is easier than it sounds. However, majority of people said they did not understand how to do it even though they put a huge amount of effort into their presentations. In fact, the PowerPoint program has built-in the recording feature to record narrative while making the presentation. Moreover, some third-party software can help people to save important presentations as well. This is a tutorial focuses on such demand.
There may be a lot of reasons that you want to record yourself presenting a PowerPoint. The top reasons include:
The biggest challenge of recording a PowerPoint presentation with audio is that the procedures are different in various program versions. Therefore, we share a guide for each version.

Step 1: Open your presentation and head to the Recording tab on the top ribbon.
Step 2: Click the Record Slide Show menu and you will get two options, Record from Current Slide and Record from Beginning. Choose the proper one based on your need.
Step 3: Then PowerPoint will bring your presentation to the viewer mode with several options on screen. To start recording a PowerPoint presentation, click the Recording button on the top left side.
Step 4: Show your presentation forward and backward. When it is complete, select End Show from the drop-down menu to save the recording.
Note: If you have inserted a video into PowerPoint, then you need to play the video while recording the presentations.

Step 1: To make a record for a presentation in PowerPoint 2013, you also need to open it in PowerPoint. Then go to the Slide Show tab, click Record Slide Show and choose the proper option.
Step 2: On the popup dialog, select the desired options and click the Start Recording button to trigger the viewer mode.
Tip: You can only capture the narration if you attach a microphone to your PC.
Step 3: Demonstrate your slide show and speak clearly. To move to the next page, click the Next button on the Recording toolbar, which also show you to timings.
Step 4: After recording, you can save it as a video. Go to File -> Export -> Create a Video, and click Create Video to open the Save As dialog. Fill in the detail and hit Save button.
Note: The recording feature in PowerPoint 2010 is almost the same with it in PowerPoint 2013. So, you can perform it with the step above in your PowerPoint 2010.
Moreover, the recording PowerPoint file can be shared with others as the video format or the DVD file.
Step 1: Open the slideshow to record in your PowerPoint and select the start slide in Normal view.
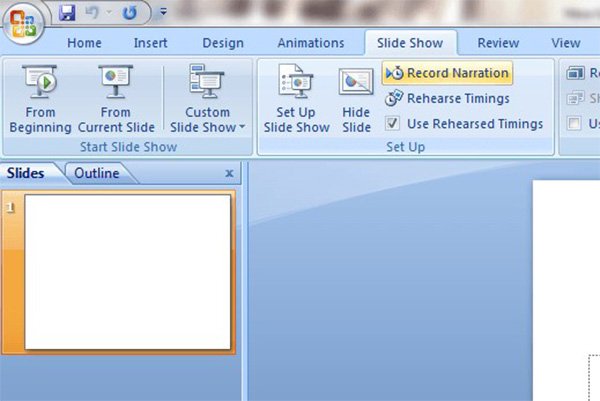
Step 2: Switch to the Slide Show tab on the top ribbon and click the Record Narration button in the Set Up group.

Note: Do not want to use the built-in audio recorder? Just try the voice recorder here.
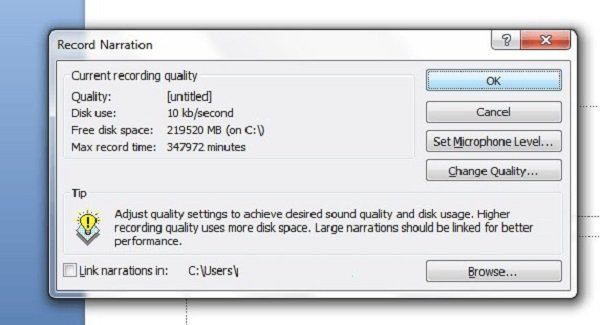
Step 3: On the popup dialog, click Set Microphone Level, set your microphone level, and hit OK. Then decide to Embed narration or Link narration.

Step 4: Now, the first slide of your presentation will show in the full screen. Add your comments and narration to each slide. When the presentation is done, click the Exit button to save the narration.
Note: PowerPoint 2007 and earlier cannot save the recording of your PowerPoint presentation as video.
Though the recording feature in PowerPoint is easy to use, it is not enough sometimes. For instance, it cannot capture your reactions via Webcam. So, we recommend AnyMP4 Screen Recorder. It is a versatile PowerPoint Presentation recorder.
In short, it is the easiest way to make a recording for your PowerPoint presentation.
Secure Download
Secure Download
Step 1: Install the presentation recorder
Download and install the easiest presentation recorder on your PC. There is a dedicated version for Mac. Next, launch it from your desktop and choose Screen Recorder in the home interface. Turn on Display, Webcam, System Sound and Microphone.

Step 2: Record your presentation
Open your slideshow in the PowerPoint and set to record full screen. Then adjust volume for System Sound and Microphone. Click the Setting icon and reset the Output, Hotkeys, and other options on Preferences dialog.
Hit the REC button and start play your presentation. If you want to add annotations, click the Painter icon and draw on the recording.

Step 3: Preview and save the recording
When the presentation finishes, click the Stop icon to take the recording to the Preview window. Here you can adjust the volume, starting point and end point. If you are satisfied, click the Save button to export the recording based on your settings.

Not only recording PowerPoint Presentations, it also records the webinar, game, etc. easily.
Now, you should understand how to record a presentation in PowerPoint 2016/2013/2010/2007 and earlier. We use presentations in both work and daily life. The good news is that Microsoft had introduced a recording feature into PowerPoint. If it cannot meet your demand, you can try third-party software, such as AnyMP4 Screen Recorder. It is not only an easy presentation recorder, but also able to capture your reactions via webcam. If you have other questions related to presentation recording, please leave a message below.